Swordsmen are the bread and butter unit of most medieval armies. They are
inexpensive and not very exciting; they are also very reliable and acquit
themselves well against most other units with the sole exception of cavalry.
Cavalry is the bane of swordsmen, just as swordsmen are the bane of spear and
pike units. Swordsmen can take down cavalry under certain circumstances but
generally it is inefficient and a last resort in desperate circumstances. If you
have to take on cavalry with swords you should try to find a wood to place them
in as the cavalry receive a significant penalty for fighting in trees, this
gives the swords a fighting chance. You should also try to attack the horsemen
with several units to gain the advantage of numbers and inflict the morale
penalties for being flanked on the cavalry. If at all possible you should have a
more capable unit, like spearmen, stand and receive the charge before sending
your swords to attack the cavalry in the rear. When you have no choice but to
receive a cavalry charge with swordsmen you should put them in four or more
ranks and on hold formation, this gives them a larger chance of surviving the
charge and fighting back. If a thin line of swordsmen is hit by a cavalry charge
they will be swept away with massive casualties, often the unit will break and
run almost immediately.
When you use swordsmen against anything other than cavalry you should deploy
them in two ranks, this allows the formation to wrap around the enemies flanks
when combat is engaged and this in turn allows the swordsmen to do much more
damage. It also adds a morale penalty to the enemy. If you do not deploy your
swords so they can wrap around at least one flank they can struggle to fight as
effectively as you might wish. This two rank deployment is especially important
when you charge a unit of spears as they will hold their formation together for
much longer if the swordsmen cannot attack from the sides, the longer the spears
hold formation the more damage they can do to your swords.
Swordsmen have no spectacular bonuses against other units – even when facing
spears they gain a simple +1 to attack and most of the swordsmen are not armour
piercing, neither do they have a significant charge bonus. This can lead to them
looking rather unimpressive in combat unless you watch closely – it may take
them a while to kill but they do it steadily and reliably, in fact reliable is
the key word with swordsmen – they are nothing if not reliable. Most swords
units have very good morale and elite or disciplined status, this combines with
their ability to hold their own in almost any situation to create a unit you can
rely on to hold the line and do damage in a hard fight. Spearmen can hold your
line reliably but it is often the swordsmen who plug the gaps, lead the charges
and generally do most of the killing. Together these two unit types can chew
through more foes than you want to count, all that is really missing from this
combo is the ranged support and a unit or two of cavalry to mop up routers.
Because of their reliability and versatility swordsmen make excellent units for
your reserve as they can go into a fight you are loosing and keep fighting until
you either win or they are decimated.
Sword units are best at: killing spears and pikes, combating other sword and axe
armed units, providing a unit that can fill any gaps in your line, being a
reliable set of men to send into difficult situations, being a strategic
reserve.
M12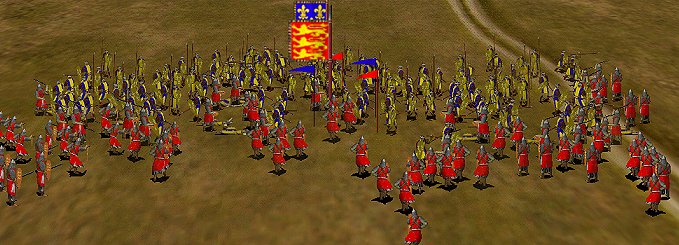
Image M12: This picture was taken one second after the swordsmen’s charge hit. As you can see they have wrapped around the spears right flank completely, the left flank is only partially wrapped. The spears are losing their formation because of this pressure and their situation will only get worse as the last few swordsmen reach the battle. This is why you want your swordsmen in long, two rank deep formations.
Byzantine infantry.
Charge 3 Attack 2 Defence 2 Armour 3 Speed 6, 10, 11 Morale 0 Cost 200 Support
cost 62
Byzantine infantry are disciplined and deadly. They have a large shield that
protects them from missiles and adds to their defence in combat. The real reason
why Byzantine infantry is so deadly is not apparent from the stats listed above
– their strength is in their numbers. Unlike most swordsmen there are 133 men
in each unit, a significant increase over the usual 80 men. This means that
Byzantine infantry are able to do more damage even though statistically speaking
they are one of the weaker sword units. They are also able to take on cavalry
far more effectively than most other swords; this is because they can outnumber
the cavalry by more than two to one. Byzantine infantry will make up the front
line of most Byzantine armies regardless of the period.
Feudal men at arms.
Charge 3 Attack 3 Defence 2 Armour 3 Speed 6, 10, 11 Morale 2 Cost 175 Support
cost 45
Feudal men at arms are elite and have large shields to protect them. They are
very solid swordsmen and they will serve well until they eventually become
outdated with the advent of the chivalric men at arms. Even after their
successors appear feudal men at arms can be useful for budget armies and a unit
of feudals with high valour will continue to strike terror in the foes hearts.
Chivalric men at arms.
Charge 3 Attack 4 Defence 3 Armour 4 Speed 6, 10, 11 Morale 4 Cost 250 Support
cost 52
Chivalric men at arms are elite and have large shields. They replace feudal men
at arms as the deadly Catholic infantry and they do a solid job on the
battlefield. The shield only has a 0.5 modifier.
Feudal foot knights.
Charge 3 Attack 5 Defence 2 Armour 3 Speed 6, 10, 11 Morale 8 Cost 275 Support
cost N/A
Feudal foot knights are elite and have a large shield, they are much more
capable then their plain feudal men at arms counterparts. Knights also possess
sky high morale – they will not break until most of them are dead. There are
drawbacks however, firstly there are only 53 men per unit and this does reduce
their potential significantly as they cannot deploy in a long enough line to
wrap around their foes flanks without stretching perilously thin. Secondly, and
perhaps most troublesome, is the fact that you can only get feudal foot knight
by dismounting a unit of feudal knights at the deployment phase of a battle.
Feudal knights can only dismount in siege situations so it is very rare for you
to control a unit of feudal foot knights, but when you do let the carnage begin!
Because this unit has heavy armour keep them out of the desert or they will
become exhausted in a matter of minutes. (Note: If you have the VI add-on you
can get large units of feudal foot knights whenever you wish by dismounting
Druzhina cavalry)
Gothic foot knights.
Charge 4 Attack 5 Defence 6 Armour 6 Speed 4, 8, 9 Morale 8 Cost 475 Support
cost N/A
Gothic foot knights are elite and have armour piercing two-handed swords that
chop most units into tiny pieces. Once again you can only get these foot knights
by dismounting gothic knights, fortunately gothic knights can dismount during
the deployment phase of any battle, not just sieges. There are only 53 men per
unit and they are very slow because of all the heavy armour they wear, once
combat is joined they will begin hacking away and do plenty of damage. Let these
armoured behemoths march straight at the enemy and attack from the front, let
other, faster units worry about flanking. The sky-high morale of this unit means
that they will march onto the field and continue fighting until victory is yours
or your army is so badly crushed that there is no dishonour in fleeing. The
gothic knights armour is so effective they can walk into a hail of missiles and
take very little damage unless those missiles are armour piercing. Once again
keep this unit out of the desert!
Hospitaller foot knights.
Charge 3 Attack 5 Defence 5 Armour 6 Speed 4, 8, 9 Morale 8 Cost 400 Support
cost N/A
Hospitaller foot knights are elite and have a large shield. They are also very
slow. As with all knights these men will win the battle or die trying. This is
the second best unit of swordsmen as far as plain stats go; once again there are
catches. In addition to the small unit size (53 men) and the need to dismount a
unit of Hospitaller knights in battle there is the problem of getting the unit
of Hospitallers in the first place. You can only get Hospitallers from a
crusade, this also means you cannot retrain to improve equipment or replace
losses. If you can get this unit they are great but the chances are you will not
be able to get many of them and when you do get them you will probably hoard
them as a treasured reserve. Despite being crusaders they still have too much
armour to handle the desert comfortably. The shield has a 0.0 modifier which
means it provides no bonus at all – it is just for show.