Polearms are another set of specialists; they are made to combat armour and
cavalry. This is a very handy combination as most of the more dangerous cavalry
has heavy armour allowing polearms to receive some very impressive bonuses when
fighting heavy cavalry. Polearms are so effective when facing cavalry they make
spears almost obsolete; the only thing that makes spears better at facing
cavalry is that fact spears are not likely to be pushed back by the cavalry’s
initial charge because of their dense formation and spear class bonuses.
Polearms are as vulnerable to cavalry charges as any other non-spear unit, to
counter this you need to use them in the opposite way to every other non-spear
unit when facing cavalry. Draw them up in two to three ranks and charge! Because
they are charging they will kill more cavalry in the initial impact and the
thinner formation allows them to get more men into the fray and increases the
likelihood of men getting around the cavalries flanks. If you do this with a
thicker formation the end result is less effective as fewer men get into the
initial killing phase meaning more cavalrymen survive to cause damage in the
ensuing melee. This approach is effective against light and medium cavalry,
heavy cavalry and knights will do a lot more damage on their charge.
When facing heavy cavalry or knights you should consider letting another unit
receive the charge and use your polearms to smash into the cavalry’s flanks
and rear, the carnage this can cause is incredible. This tactic allows spearmen
to continue to be useful after the advent of polearms as they remain the best
unit for receiving charges. Polearms should always be left on engage at will as
they receive no rank bonuses and they need to get in amongst the enemy to really
reach their full potential. Against infantry units you should use your polearms
in two ranks and let them engage at will, in many ways they should be used like
swordsmen when facing infantry. Draw them up into formation, march them close to
the enemy and then charge into battle. Generally speaking the polearm units are
capable of putting up a good fight if they cannot flank, unlike many of the
Axemen for example. Therefore you should flank when you can but it is not vital
to their proper usage. Polearms not only semi replace spears they also semi
replace swords as most infantry units in the high and late eras have armour,
enabling polearms to take them on very effectively. Against the unarmoured units
swordsmen are still much better. This means you can reduce the number of sword
and spear armed infantry in your army and replace them with the multipurpose
polearm troops, this is more effective for some factions than others as the
basic halberdier is not nearly as good at multitasking as the billman or
Janissary heavy infantry.
Polearms are best at: killing armoured units, killing cavalry, acting as
multipurpose infantry.
For more on the armour piercing bonuses look in appendix 4.
M15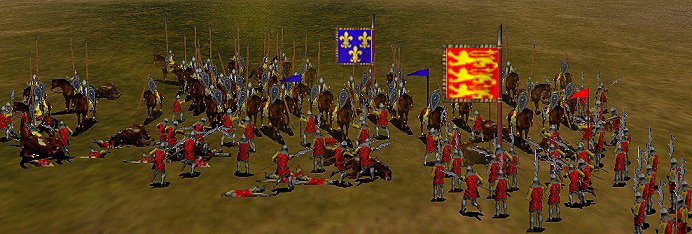
Image M15: This unit of Billmen has been forced to receive an enemy
cavalry charge. They formed up into two ranks and charged the knights. On impact
14 billmen and 4 knights died, the billmen wavered for a second before steadily
dispersing amongst the knights and slaughtering them. The final statistics were:
billmen 20 lost, knights 43 lost.
M16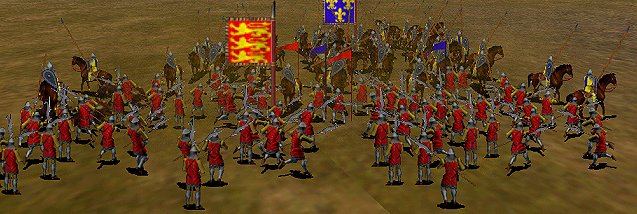
Image M16: Here the same battle is repeated with the billmen in four ranks to resist the shocking effects of the knights charge. On the initial impact 7 billmen and 2 knights died. In the subsequent battle the billmen were slow to get in amongst the knights and fight them off. The billmen won in the end with 27 dead against the knights 36. This demonstrates how much more effective the two ranks are when receiving a cavalry charge.
Billmen
Charge 2 Attack 2 Defence 4 Armour 3 Speed 6, 10, 11 Morale 2 Cost 300 Support
cost 37
Billmen are the first unit of proper (i.e. not a peasant militia – see the
peasant section below) polearms you can get - that is as long as you are
English! Billmen are very good, solid polearms and they have balanced stats.
This means they can kill effectively and survive the battle in reasonable
numbers as long as nothing disastrous happens. While billmen can handle a
front-on charge by heavy cavalry you should try to avoid this, as they are not
strong enough to resist the charge without taking substantial losses in the
process. Send billmen charging into the rear of a group of heavy cavalry and
they will slice them up into horsemeat.
Chivalric foot knights.
Charge 2 Attack 4 Defence 6 Armour 5 Speed 4, 8, 9 Morale 8 Cost 550 Support
cost N/A
Chivalric foot knights are elite and are almost tied with Janissary infantry for
the honour of being the best polearms, maybe even the best infantry full stop.
Chivalric foot knights can charge headfirst into heavy cavalry or knights
without too many problems, they have very high armour and formidable defences so
you can be certain they will survive the battle unless they run into armour
piercing units or get shot up by armour piercing missiles. Chivalric foot
knights also have a decent attack value; it is deceptively low, as the armour
piercing effect will enable them to rip through targets with a hint of armour.
Unarmoured targets generally find it difficult to damage the knights meaning the
battle becomes one of endurance that the knights can slowly win. Chivalric foot
knights are not perfect. Firstly they are very slow, it is a good thing they can
handle a head on charge because they are too slow to do anything else
effectively! The small size of the unit (53 men) makes them vulnerable to being
overwhelmed – they may be able to fight like heroes but even a hero dies when
outnumbered four to one. The final disadvantage is not actually much of a
disadvantage; chivalric foot knights must be dismounted from chivalric knights
during the deployment phase of the battle. However since chivalric knights are
some of the best cavalry in the game this is not too much of a hardship! Some
people even make armies out of nothing but 16 units of chivalric knights, they
keep half mounted and the other 8 units fight on foot. Apparently this is very
effective even though there is no missile support.
Halberdiers
Charge 2 Attack 1 Defence 6 Armour 5 Speed 4, 8, 9 Morale 0 Cost 300 Support
cost 45
Halberdiers are the final unit in the peasant food chain. Unlike militia they
are not classed as peasants because they have enough training and stats to
squeak into the professional soldier class. Halberdiers are slow but unlike the
chivalric foot knights they do not really have the stats to march straight at
the enemy and damn the consequences. Their morale is too low and their attack is
also low so they will not do much damage, even against armoured targets. The
best use for halberdiers is hinted at by their extraordinary armour and defence
ratings – most missiles will bounce off their armour. This allows them to
stand in the middle of a missile storm and only take a couple of casualties –
if they do not take casualties they receive no morale penalties. It is also hard
for other units to kill the individual men, unless they have armour-piercing
weapons and even then it will take some time before the casualties start to add
up. Therefore halberdiers are very effective when you need a unit to send into
an arrow shower to deplete enemy ammunition and set up a bridgehead while your
other, better units move in to attack. Send halberdiers across a bridge first,
they will take few casualties from the missiles and they will be able to hold
their own on the other side of the bridge just long enough for your more
valuable troops to cross in safety. Yes they will eventually break and run, yes
they will do little damage but all that matters is that they will have absorbed
the missiles and given others a chance to cross in safety.
Janissary heavy infantry.
Charge 4 Attack 5 Defence 3 Armour 3 Speed 6, 12, 13 Morale 8 Cost 725 Support
cost 67
Janissary heavy infantry are elite, disciplined, have a shield and are probably
the best infantry in the game. Question - what can Janissary heavy infantry kill
effectively? Answer – anything that is alive. Fast speed allows this unit to
nip around flanks, get out of dangerous situations and chase down most infantry
missile units reasonably. The high morale allows them to take massive losses or
fight when heavily outnumbered and keep going like some kind of inevitable
machine of doom rolling over the foe. The high attack allows them to cleave
through any unit, it is high enough to do plenty of damage against unarmoured
units and against armoured units the Janissary heavy infantry can be compared to
a can opener! The defence and armour is adequate, in fact the low armour is
something of a bonus as it allows them to fight in any climate and weather
without getting hit by the penalties for heavy armour. Janissary heavy infantry
have no problems in the desert. The lower armour stat also protects them from
armour piercing units. Janissary infantry can handle frontal assaults on just
about anything and they are fast enough to flank, they can do what ever the
situation requires and you should take advantage of this flexibility. Basically
if you are the Turks then you want to use this unit, if you aren’t the Turks
then you wish you had this unit. This unit cannot use its shield in a melee as
the polearm is a two handed weapon. The shield only protects from ranged
attacks.
Swiss halberdiers
Charge 2 Attack 3 Defence 3 Armour 2 Speed 6, 10, 11 Morale 6 Cost 375 Support
cost 52
Swiss halberdiers are the polearms you want to use if you are neither the
Turkish nor the English; they are significantly better than halberdiers for most
jobs. Swiss halberdiers are not as heavily armoured and have lower defence so
you should not use them to absorb ranged fire, leave that to the halberdiers.
Instead you should use their higher attack values and reasonable speed to strike
from the flanks or rear and quickly damage the enemy. Because they have high
morale they can take losses and fight in unfavourable situations with few
problems, always remember this.