And so we reach the second hardest type of units to use. While missile
cavalry are the hardest to use javelin and naptha units are not far behind. I
shall break this section into two subsections as the two unit types require
slightly different tactics and have slightly different capabilities. All the
units in this chapter have exactly four rounds of ammo each, four javelins or
four naptha grenades.
Naptha.
These men are equipped with a form of primitive grenade that they will throw at
close range into the enemy ranks where it explodes causing astonishing damage.
Naptha grenades kill in one shot regardless of who you are, this makes them very
handy for taking out royalty and generals as these men have several ‘lives’
and require killing several times before they actually die. However a single
naptha bomb will kill you if you are Bill the peasant with a pitchfork and a
grubby tunic or King Alfonso IV with the fancy armour and massive empire.
Sometimes there is nothing so satisfying as blowing your hated rival to kingdom
come with a grenade, one tiny explosion and problem solved! It is certainly
preferable to slowly wearing them down with troop after troop of soldiers and
receiving heavy losses as you wait for him to die already!
Each naptha explosion can kill several men at once so they are best used on
tightly packed groups. Bridges in particular provide excellent opportunities for
naptha throwers and they can kill as much as ľ of a unit in one volley – that
is ľ of a large unit like spears! The large death toll is accompanied by a
morale penalty for explosive weapons and is almost always an instant rout.
Sounds good so far, one volley for devastation, kills pesky generals and royals,
scares the enemy and generally looks cool. What is so hard about that? Simple
– getting a volley off in the first place! Naptha throwers have a tiny range,
if you leave them on skirmish they will pull back before they even think about
readying a grenade. You must always turn off skirmish if you want them to
do something other than run away.
So you’ve turned off skirmish, now you can blow things up right? Wrong,
because of their short range and long priming sequence (pull out grenade, find
match, light grenade, count to three, throw! ) you will be lucky to get a single
volley before the enemy reach and kill them. Of course if you get that volley
and everyone in your unit lobs their grenade like they should you will rout the
unit before they can cause any damage. Unfortunately this assumes you are facing
an absolute idiot – not even the AI on easy is dumb enough to slowly stroll up
to your naptha throwers. Instead they charge and when the enemy are running at
full speed towards your naptha throwers you will be lucky to even reach the
‘light fuse’ stage of the priming sequence before they are upon you and
killing your men. If it is a particularly auspicious day one or two men will
throw a grenade into the melee as their comrades die, you can expect that one
grenade to kill 4 men and two or three of those men will be yours. How do you
combat this problem? You use a rubbish unit to pin the enemy in place, spearmen
are ideal as they are cheap, bulky and last for a respectable amount of time in
combat against most foes. Stand your naptha throwers behind the spears and take
them off skirmish. Let the enemy charge into your spears and as soon as the
fighting begins order your naptha throwers to open fire. They will fling their
grenades over the spearmen’s heads and into the enemy; the resulting explosion
will kill a lot of the enemy and some of your own spearmen. This is why you
always use a cheap, expendable unit for pinning.
Where ever possible place your naptha throwers on higher ground than their
targets, this increases their range and keeps them safer. Also try to get them
valour as quickly as possible; it increases their accuracy tremendously. Better
accuracy=more grenades on target=more big explosions=more dead enemy!
Never let the naptha throwers do what they want, give them precise orders or
keep them the heck out of the way. If left to their own devices they tend to
blow up important and expensive units you want to keep. Losing a battle because
your naptha throwers bombed your general is embarrassing so don’t let it
happen!
Naptha throwers are useless when it rains or snows – without dry matches they
cannot light their grenades.
Practise these tactics, learn the missile range, experiment with them in
different climates and situations and you will turn naptha throwers into a
deadly force. Have fun!
Naptha units are best at: killing anything and everything with the aid of a junk
unit, killing royals and generals, scaring the enemy, destroying dangerous units
in one fell stroke.
M25
Image M25: This picture illustrates the naptha throwers range on a
flat piece of ground. They can just target the enemy but if the enemy get
pushed back even slightly the naptha throwers will have to move forward.
M26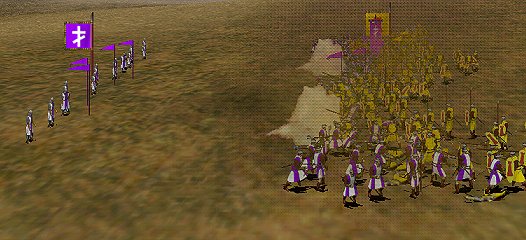
M27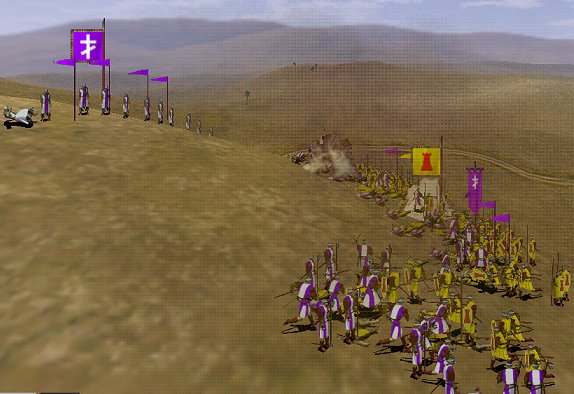
Image M27: Now this is much better! The naptha throwers are on the
high ground giving them an excellent shot at the enemy. As you can see they are
wreaking havoc. If you look very closely in the middle of the picture, obscured
by the dust clouds you can see a few grenades flying through the air. If you are
wondering what happened to the dying naptha man of the far left of the picture,
well he blew himself up!
M28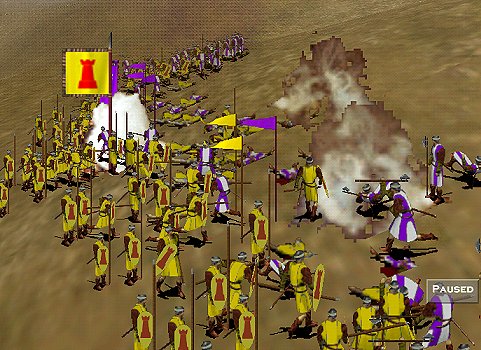
Image M28: A close up of the damage caused by just three naptha grenades. In the foreground you can see several bodies being flung outwards by a single grenade, unfortunately most of the dead men are yours! In the middle ground you can see a second explosion and this one is right in the middle of a tight cluster of enemy. They were just beginning their death animations as this picture was taken. Also in the middle ground is a large pile of dead enemy bodies – they were the victims of the first grenade to be thrown. If the naptha throwers had acted in unison and thrown their grenades at the same time there would be only a handful of living people in this picture!
Javelins.
This unit shares most of its tactics with the naptha throwers but there are a
couple of fundamental differences. Like naptha throwers you must take javelin
units off skirmish mode if you want them to do something other than run away,
they have a very short range. You also need to work in conjunction with a junk
unit to pin the target in place giving the javelins the opportunity to release
their missiles in peace. The difference is that unlike naptha units it is
better to send the javelins around behind the pinned target and launch the
missiles into their backs. While javelin units can throw their missiles over the
junk units heads they are always more successful when they have an unobstructed
view. This is because the javelins do not have an explosive radius, they must
hit a man to do damage and a clear view aids accuracy and therefore damage. This
method also reduces friendly casualties which is always a good thing, your junk
unit is cheap and expendable but it still costs money to replace! If you cannot
avoid launching your missiles over the junk unit’s heads try placing your
javelins on higher ground than everyone else, this not only increases their
range and damage it also gives them a clear view.
Javelins are armour piercing and therefore fantastic for taking out heavily
armoured targets. Because of their short range they are also very accurate in
comparison to the other missile units in the game. When you face a bunch of
armoured, expensive and deadly units like knights javelins are an acceptable low
budget – high gain solution as they will kill many people in each volley. If
you target a unit of 53 knights from behind while they are pinned you can expect
to kill around 7 men per volley, after you launch all four volleys there will be
very little left of the knights and they will probably rout.
Javelin units are best at: Killing armoured units, providing large and
demoralising volleys of missiles that do a lot of damage.
M29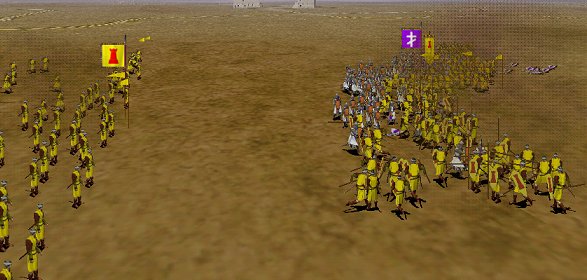
Image M29: This picture conveniently illustrates both the javelins
maximum range and how best to deploy them on flat ground.
M30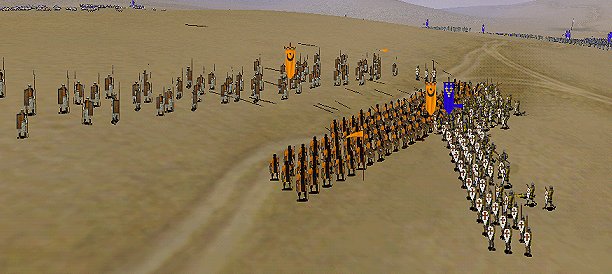
Image M30: When you have to use your javelins from behind a friendly unit this is what you should do – stand on a hill above everyone else and throw into the melee. As you can just about see from the trajectory of the airborne javelins there will be some friendly casualties as the javelins are going to land slap in the front rows of both units. Just hope that more of the enemy die than your own men and be happy that you are killing some expensive and tough enemy troops in exchange for some relatively cheap men of your own!
Almughavars
Charge 6 Attack 3 Defence 0 Armour 2 Speed 6, 12, 13 Morale 8 Cost 425 Support
cost 60
Almughavars are surprisingly good on the charge and attack, even if their
defensive stats are rather crap. Therefore throw your javelins into your target
unit and then rush in to finish off the confused and disorganised survivors in
the melee. Because they are armed with a spear for melee combat you should use
them on hold formation and try to keep the formation as neat as possible so you
get the rank bonuses. Almughavars are mercenary units; they cannot be built in
the campaign. Consequently they are rather rare.
Kerns
Charge 3 Attack 2 Defence -3 Armour 1 Speed 6, 12, 13 Morale 0 Cost 125 Support
cost 22
Kerns are Irish, so you must conquer and hold Ireland to build them in the
campaign. Once they have thrown all their javelins you can order them to charge
in with their short swords for a quick shock to the enemy. Because of their
horrendous defence don’t expect many kerns to survive the experience! Think of
this unit as cheap and therefore very disposable – while they take massive
losses in a fight and flee quite quickly they are easy to replace and won’t
break the bank.
Murabitin infantry
Charge 2 Attack 1 Defence -2 Armour 1 Speed 6, 12, 12 Morale 4 Cost 150 Support
cost 37
Murabitin infantry have a large shield and use a sword as a back up weapon. When
it comes down to close combat they are not highly impressive, although they are
somewhat better than kerns as their large shield offers a bonus to their defence
when enemies are attacking them from the front. Once again think cheap and
disposable.
Naptha throwers.
Charge 1 Attack 0 Defence 2 Armour 3 Speed 6, 10, 11 Morale 2 Cost 200 Support
cost 37
Naptha throwers are disciplined and should be kept out of a melee at all costs
unless you want to lose them! While their stats may not be as bad as some other
units (kerns, peasants etc) the difference is in numbers – there are only 16
men in a unit of naptha throwers and that is on large unit sizes! Sending them
into a melee is usually asking them to die and while they are cheap and easily
replaced this will make your life harder in the long run. Naptha throwers really
benefit from valour – high valour makes them significantly more accurate and
that is a good thing. Let them throw their bombs and then let them go home
safely.