Knights are the elite of the heavy cavalry. Very few units from the other
cavalry classes can match the raw power of a knight and his charger. Knights are
built to do one thing and one thing only – charge. Knights have the most
damaging charge possible in the game and only spear and pike units can withstand
it. Any other unit types are very likely to be swept away with many casualties
and a damaged formation. To take best advantage of this charge you should try to
flank and hit the enemy in the rear, this not only causes more damage but it
makes it more likely that the enemy will rout. Knights are wasted in a melee so
you should aim to charge and rout the enemy within a few seconds of combat. If
the enemy do not break pull your knights back by either double clicking on the
location you want them to go to or hitting control+W to make them withdraw. If
you make them withdraw you must remember to order them to halt before they get
too far away or they will leave the battlefield. As for which method is more use
it depends on the situation. Sometimes your knights will ignore your move order
and refuse to leave the fight; in this case ordering a withdrawal is more
reliable. However in the middle of a heavy fight ordering your knights to
withdraw can place them in worse danger. There is a third option that is more
reliable than the others with a reasonable amount of micromanagement: put your
unit on hold position and them immediately double click where you want them to
go. The hold position order applies to the location you just designated and the
knights will stop fighting and move without the usual hassle. Just remember to
take them off hold position when they are safe. You will take casualties doing
this, but often less than with the other two methods. You should learn all three
methods and discover when to use each one. When your knights are a reasonable
distance from the fight order them to charge back in. Keep doing this until the
enemy break. Generally speaking knights possess average speed for cavalry –
they are not fast but they are not slow either. This aids their flanking
abilities.
If a unit is wavering when the knight’s charge hits it then it will most
likely break and run. This means that knights can be used as a shock force to
speed the end of melee fights, freeing your units to double team the enemy and
gain a local advantage in numbers. You should pick your targets carefully in a
situation like this as knights tire quickly; they only have a few charges in
them before they become exhausted. Therefore target the most important units to
the situation and work from there.
Knights are not the invincible warriors popular legend and Hollywood might
portray them as. Spear and pike units will halt their charge and inflict serious
casualties unless the knights hit them in the flank or rear. Charging head on
into a forest of sharp points is suicide – don’t do it. Polearm units will
also cut knights up as they get both anti-cavalry and anti-armour bonuses. Never
allow your knights to engage polearms, even if you hit them from the rear they
may not rout. If the polearms stand and fight they will win or cause very heavy
damage as they die.
Knights are well equipped to take out swordsmen and missile units so focus on
these unit types for maximum efficiency. You should bare in mind that armour
piercing missile units like crossbows and arbalesters will inflict many losses
on any unit of knights trying to charge them through a barrage of missiles,
therefore always attack from the flanks or rear. However you can always attract
the attention of the missile unit with a junk unit and charge your knights in
while the other unit absorbs the missiles. Plain spearmen are good for this as
they are cheap, unimportant and they have shields to protect them a little.
All knights are elite and impetuous so bear this in mind when you use them. Also
because of their heavy armour any knight will quickly cook in the heat of the
desert so try to keep them in cooler climates. Knights should NEVER, ever fight
in trees. Cavalry receive significant penalties when fighting in trees and
knights are far too expensive to waste in this way. Once again – keep them
away from trees at all costs!
Knights will not only charge without orders due to their impetuous nature, they
will also choose their own targets and ignore your orders. They seek glory and
honour in battle and there is no glory in running down peasants. You must keep a
close eye on your knights so you can stop them quickly if they charge without
orders; unfortunately knights have a habit of picking unsuitable targets so if
you don’t watch them they can ride into disaster. The crusader knights are
much more controlled than their normal counterparts so take advantage of this.
Knights are best at: Charging, flanking and charging, routing wavering units by
charging, and just generally charging!
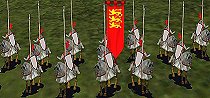
M17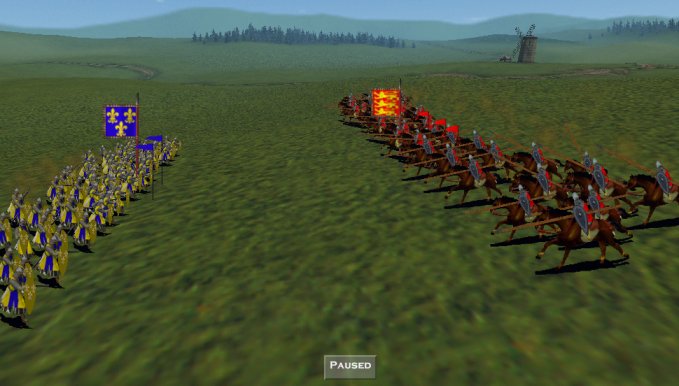
Image M17: A unit of knights at the moment the charge begins. Since their target is a unit of vulnerable swordsmen they can risk a head on charge. While this looks glamorous this is not really the best way to use your knights.
M18
Image M18: This picture demonstrates a much better use of the knights
charge. The infantry line has buckled under enemy pressure and soon the line
will rout. However a single unit of knights have been sent around to charge the
enemy in the rear, because the knights are deployed in a long, two rank
formation they managed to hit two units of enemy spearmen from an advantageous
position. The enemy unit on the left routed instantly and the unit on the right
followed shortly after. The knights killed 47, captured 12 and lost 3 men. The
careful use of the knight’s charge won the battle.
M19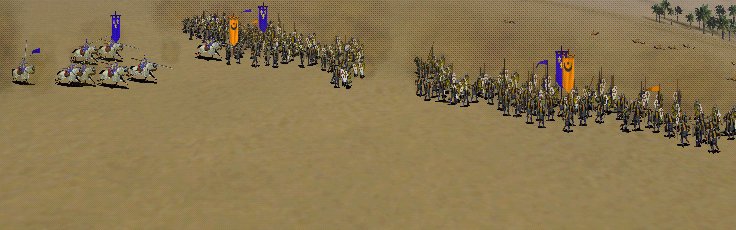
Image M19: A small demonstration of just how dangerous the knights
charge can be. There are only 8 tired and battered French knights in the unit
shown here. The Almohad urban militia is fresh and easily beating the tired
Order foot in combat and their morale is high. A few seconds after this picture
the first unit of Almohad urban militia had routed and the second was wavering
– why? Simple the knights’ charge did a lot of damage to the militia and
that combined with the morale penalty for being attacked from behind and
outnumbered locally caused them to rout. This upset the second unit of militia
and boosted the morale of the Order foot. 8 knights, just 8, turned the tide of
this skirmish in a couple of seconds.
Feudal knights.
Charge 8 Attack 4 Defence 3 Armour 4 Speed 9, 20, 22 Morale 8 Cost 425 Support
cost 105
Dismount: During a siege to get feudal foot knights.
Feudal knights have a large shield and a lance. They are the weakest knights in
the game but even so they are powerful when used correctly. Feudal knights are
very useful in the early era but when the much better chivalric knights appear
they are less useful.
Chivalric knights.
Charge 8 Attack 5 Defence 5 Armour 7 Speed 9, 20, 22 Morale 8 Cost 675 Support
cost 85
Dismount: Anytime for chivalric foot knights.
Chivalric knights have a large shield and a lance. Their horses are protected by
barded armour and this makes them less vulnerable. Chivalric knights represent a
noticeable improvement over their feudal brethren, their defence is much more
substantial, their attack is slightly better and their armour is much better.
The higher armour stat is something of a double-edged sword as it makes them
more vulnerable to anti-armour units. The shield only has a 0.5 modifer.
Gothic knights
Charge 4 Attack 4 Defence 7 Armour 9 Speed 9, 12, 16 Morale 8 Cost 725 Support
cost 60
Dismount: Anytime for gothic foot knights.
Gothic knights are equipped with a mace, this makes their charge weaker and
their attack stat is lower than a knight with a lance. However there is an
advantage to this – a mace is armour piercing. This fact, combined with their
high defence and armour makes gothic knights better at charging just the once
before hacking it out in a melee. The horse is encased in full armour as well so
this knight is more than tough to take down – only units with armour piercing
capabilities stand a fair chance in combat with them. Because this unit has such
low speed you are best charging them straight at the enemy, they just don’t
have the speed to flank as effectively. Also they tire even faster than the
other knights because of all that armour so running them around is not a good
idea.
Knights Hospitaller
Charge 8 Attack 5 Defence 5 Armour 7 Speed 9, 20, 22 Morale 8 Cost 675 Support
cost 50
Dismount: Anytime for Hospitaller foot knights.
Knights Hospitaller can only be got from a crusade; they cannot be built or
retrained. They are equipped with a large shield and a lance, the horse is
protected by barding. Basically this unit is chivalric knights by another name,
when you get them from a crusade in the early period they are simply
devastating. Once you are in the high and late periods they are less amazing but
they remain very good units, just like chivalric knights. Unlike normal knights
these crusaders are not impetuous, this makes them easier to control and more
reliable. The shield only has a 0.5 modifer.
Knights of Santiago.
Charge 8 Attack 5 Defence 5 Armour7 Speed 9 ,20, 22 Morale 8 Cost 675 Support
cost 50
Dismount: Anytime for chivalric foot knights.
Knights of Santiago are basically knights Hospitaller with a new name and shield
graphic. Read their section for more.
Knights Templar
Charge 4 Attack 5 Defence 5 Armour 7 Speed 9, 20, 22 Morale 8 Cost 600 Support
cost 50
Dismount: Anytime for chivalric foot knights.
Knights Templar are basically knights Hospitaller with a new name and shield
graphic. They are armed with a sword and this makes their charge weaker. Read
the Hospitaller section for more.
Early royal knights.
Charge 8 Attack 4 Defence 3 Armour 4 Speed 9, 20, 22 Morale 8 Cost 325 Support
cost 62
Dismount: In a siege for feudal foot knights.
Early royal knights have a large shield and a lance. There are only 20 men in
the unit, 21 if it belongs to a prince or king, and this is their greatest
weakness. While each individual knight is identical to the feudal knights they
work alongside the unit as a whole is more vulnerable to being overwhelmed by
sheer numbers. Use this unit for surgical strikes – move to an advantageous
position and charge home where you can do the most damage without getting
outnumbered too severely. If this unit contains an important figure like an heir
you should be doubly careful. Because of the small size they will gain valour
quickly in battle, so as long as you are careful you will develop a fearsome
unit relatively quickly.
High royal knights
Charge 8 Attack 5 Defence 5 Armour 7 Speed 9, 20, 22 Morale 8 Cost 525 Support
cost 62
Dismount: Anytime for chivalric foot knights.
High royal knights are a better version of early royal knights (same stats as
chivalric knights instead of feudal) and should be used in the same way.
Late royal knights
Charge 8 Attack 5 Defence 7 Armour 9 Speed 9, 20, 22 Morale 8 Cost 650 Support
cost 62
Dismount: Anytime for chivalric foot knights.
Late royal knights are a better version of high royal knights (same stats as
lancers instead of chivalric knights) and should be used in the same way. Late
royal knights get no shield bonus at all because the modifer of 0.0 turns it
into a decoration.
Teutonic knights
Charge 8 Attack 5 Defence 5 Armour 7 Speed 9, 20, 22 Morale 8 Cost 675 Support
cost 50
Dismount: Anytime for chivalric foot knights.
Teutonic knights are the same as knights Hospitaller with a new name and shield
graphic. They are also impetuous. Read the knights Hospitaller section for more