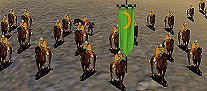
Missile cavalry are one of the most difficult classes of unit to use. They
require plenty of practice before they become truly useful to your army. When
you do master them they become a deadly force capable of raining death on the
enemy before nipping out of the way, leading the enemy into traps and forcing
them to split their numbers. Watching someone use missile cavalry well is an
incredible experience, with the cavalry endlessly moving to a better position
luring, feinting, retreating and killing in an endless dance. Some people can
manage many units of missile cavalry at once, with each one performing the
aforementioned dance in perfect harmony. Such mastery is rare, as it requires
hour after hour of dedicated training and more than a bit of ambidexterity!
The first thing to learn when using missile cavalry is that the skirmish AI is
useless, worse than useless even. When you leave a unit of missile cavalry to
skirmish on their own they will often pull back in a poor direction and allow
themselves to become trapped. They will only skirmish from the unit they are
targeting, this means an entire army can waltz up to them and attack them and
the cavalry won’t move unless their target starts to draw closer. You should
always keep an eye on your missile cavalry so you can pull them back or redirect
them as necessary. Learn to do this and you will start to be more successful
straight off the bat.
The second most important thing you need to learn is infantry missile units kill
mounted missiles with ease, therefore keep your missile cavalry out of range.
Infantry missile units (normal bow, crossbow, arbalest and longbow. Not guns or
javelins) have both superior range and superior accuracy when compared to the
mounted versions. The mounted missile’s horse also provides a much larger
target than a single man on foot. If you have to take out infantry missile units
with missile cavalry then order them to draw their melee weapons and charge.
Generally your cavalry will have the advantage in a melee – just make sure you
aren’t charging particularly weak cavalry into one of the cavalry killing
infantry units! Longbowmen in particular are very good at giving enemy cavalry a
heck of a shock.
When waging a constantly moving war missile cavalry have (with a few exceptions
noted in their relevant sections) two major weapons at their disposal – speed
and stamina. All missile cavalry have a minimum speed of 9 walking, 20
galloping, 22 charging and this is on a par with most other cavalry. Many
mounted missile units have much faster speed so they can outrun all but the
fleetest light cavalry. Coupled with their blinding speed is outstanding stamina
(again with a few exceptions noted in the unit descriptions), missile cavalry
can gallop around the field for a long time before tiring.
With a couple of exceptions all missile cavalry use the mounted normal bow. This
means they have very little effect on heavy armour so don’t waste your arrows
on heavily armoured targets. The two exceptions are jinetes and mounted
crossbows. Jinetes use javelins that pierce armour with terrifying efficiency
and mounted crossbows use the same crossbow as the infantry crossbowman. All
mounted missile units except jinetes have exactly 28 arrows in their quivers,
the same number as an infantry archer. Jinetes have just 4 javelins per man.
So, bearing all this in mind, what should you be doing with your mounted missile
units? You should target vulnerable units and try to damage them badly and draw
them out of position, if they move towards your cavalry pull back and keep
shooting until the unit is isolated and ready for a quick death. Charge several
units of suitable killers (i.e. Don’t send in cavalry if you are luring
spears) and crush the unit. Then go out and draw more units to their doom.
Unless you have a very long time to spend in the battle try to draw two units at
once, both in different directions and using two different teams of mounted
missiles and killers. If you attack on many fronts at once the enemy are forced
to split their army to deal with you, this makes them easy to surround and crush
at will.
When faced with dangerous units like knights try to aggravate them into charging
your mounted missiles by launching a few volleys at them. The arrows will not do
much damage but they may irritate the knights into action, after all knights are
impetuous and proud and they often take bait like this. Since knights are slow
and have poor stamina for cavalry you can safely lead them all over the
battlefield in pursuit of your missile cavalry. Then, when the knights are very
tired or exhausted you can surround them with several other units and kill them
reasonably easily. This tactic also works with certain powerful infantry units
like foot knights, Varangian guardsmen etc.
Mounted missiles are best at: luring the enemy into traps, causing chaos and
disorder in the enemy lines, leading powerful but slower units on long marches
to tire them out, distracting the enemy and forcing them to play on your terms.
M20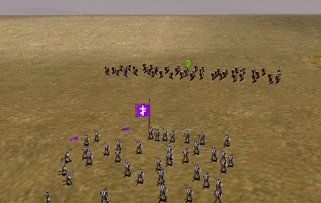
Image M20: This is what often happens if you let the AI control your
skirmishing missile cavalry. They are boxed in and will have to perform a
difficult and slow wheel to the right if they want to escape. The enemy will
probably catch them part way through this manoeuvre and have the advantage of
hitting them in the rear. To the left of the picture is the corner of the map,
behind them is the edge of the map, and the only way out is to the right. They
will inevitably leave it too late to begin their move and they do not have
anywhere to run to once the Varangian guards catch up with them. In essence this
unit is dead.
M21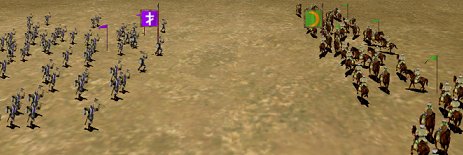
Image M21: This picture illustrates the range at which your
skirmishing missile cavalry will begin to pull back. They are just beginning the
manoeuvre now and because they are up against some slow infantry they will not
have any problems getting to safety. If the Varangian guards were fast infantry
like Janissary heavy infantry the cavalry would probably lose a few men from the
back of the formation as they would be too slow to get to safety. If the missile
cavalry were targeting other cavalry it would be far too late to get to safety.
M22
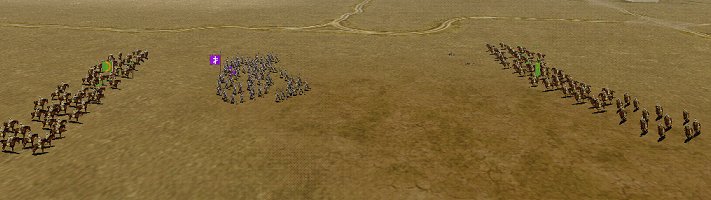
Image M22: This picture illustrates missile cavalry doing what they do best. The unit of the left has lured an enemy unit away from its army and is leading it further and further away by firing missiles and pulling back. The distance between the enemy and support is now great enough for a second unit of missile cavalry to nip in behind the enemy and shower them with arrows. No matter what this unit of Varangian guards tries to do they will be shot to pieces, chasing after the cavalry just wastes their energy. When the cavalry have whittled the enemy down suitably they will charge in and finish them with their swords, surrounding the enemy on all sides. Under normal circumstances the guards would rip both units of Turcoman horse to pieces but because they had lost half the unit to arrows and exhausted themselves running after the nimble cavalry they were cut to pieces by the cavalry when they charged.
Boyars
Charge 4 Attack 3 Defence 5 Armour 5 Speed 9, 20, 22 Morale 6 Cost 550 Support
cost 105
Dismount: In a siege for feudal men at arms.
Boyars are elite and have a large shield. They are a very solid unit as they are
both good at range and up close. When they run out of arrows or need to attack
close up you need not worry too much about them, let them draw their swords and
get stuck in. If possible attack from an advantageous position to maximise their
small charge bonus.
Byzantine cavalry
Charge 2 Attack 3 Defence 3 Armour 4 Speed 9, 20, 22 Morale 4 Cost 400 Support
cost 85
Dismount: In a siege for Trebizond archers.
Byzantine cavalry are disciplined and elite. This unit is nice and versatile as
they are capable of filling both the role of mounted missiles and the role of
slow and tough light cavalry. Let them empty their quivers and then let them
switch to a light cavalry role. Read the section on light cavalry below for some
ideas on using them as light cavalry.
Sipahi of the Porte
Charge 4 Attack 3 Defence 6 Armour 7 Speed 9, 20, 22 Morale 6 Cost 500 Support
cost 105
Dismount: In a siege for Janissary infantry.
Sipahi of the Porte are elite, disciplined and have a shield. There are only 20
men per unit, 21 if the unit belongs to royalty. Sipahi of the Porte replace
Ghulam bodyguards as the Turkish royal unit. This unit are very powerful in
melee combat so don’t worry about sending them in to fight up close and
personal, just remember that they are vulnerable to being swamped due to the
small size of the unit.
Golden horde horse archers
Charge 2 Attack 3 Defence 1 Armour 3 Speed 9, 24, 26 Morale 4 Cost 575 Support
cost 30
Dismount: Anytime for Golden Horde warriors.
Golden horde horse archers are disciplined and their good morale makes them
reliable when skirmishing and fighting in isolated areas. Because they use
swords as melee weapons they don’t perform outstandingly against anything,
however they are very effective at running down routers and delivering the coup
de grace to weaker units.
Horse archers
Charge 2 Attack -1 Defence 0 Armour 2 Speed 9, 24, 26 Morale –1 Cost 250
Support cost 40
Dismount: In a siege for archers.
Horse archers are the bog standard unit of this category and therefore the
worst. They have terrible morale so you must watch them carefully when they
skirmish, if they get too far away from friendly units, run out of ammo or get
surrounded they will be in danger of routing. They are also not very good in a
melee, though they can run down routers reasonably well. Don’t use them if you
can use any of the other types in this category.
Mamluk horse archers
Charge 2 Attack 3 Defence 1 Armour 3 Speed 9, 20, 22 Morale 4 Cost 375 Support
cost 70
Dismount: In a siege for desert archers.
Mamluk horse archers are elite and have a small shield. They are reliable in
most situations and should perform well enough as long as you keep them out of
tough fights and let them pick off vulnerable units from an advantageous
position.
Mounted crossbowmen
Charge 2 Attack 0 Defence 2 Armour 3 Speed 9, 24, 26 Morale 2 Cost 300 Support
cost 50
Dismount: in a siege for crossbows.
Mounted crossbowmen are the only mounted missile unit to use the crossbow. This
is both their advantage and their Achilles heel. The crossbow grants them a long
range and armour piercing capabilities; it also curses them with a slow reload
time. As long as you remember that they will only shoot at roughly half the
speed of other mounted missile units you should have no problems. Don’t waste
this unit by shooting at unarmoured units – seek and destroy anything with
armour. Because they shoot at a slower rate this unit not only wastes its armour
piercing potential against unarmoured units it is also less effective than the
standard, normal bow armed mounted missile units because the standard bows will
shoot at a faster rate and therefore do more damage when compared to mounted
crossbows in the same amount of time. Try to keep this unit from hand to hand
combat, let it chase routers if you must but only let it join a melee if things
are desperate. This unit can always do more damage with missiles than swords.
Spanish Jinetes
Charge 2 Attack 2 Defence 2 Armour 3 Speed 9, 24, 26 Morale 2 Cost 250 Support
cost 50
Dismount: In a siege for feudal sergeants.
Spanish Jinetes have a small shield and use javelins instead of a bow or
crossbow. Because of this they don’t really fit into this section that well,
neither do they fit comfortably into the javelin section. I have put them here
because they are closer to being mounted missile units than javelin units and
many of the tactics outlined above require only minor adjustment before they
apply to this unit. The first adjustment is the skirmish setting – take it off
or your men will not throw a single javelin. Javelins have such short range that
the unit will skirmish back before successfully completing their throw. The
second difference is in how many missiles they have and what those missiles are
capable of. Jinetes only have 4 javelins per man and those javelins are deadly
against armour – only naptha and siege engine projectiles are more deadly
against armour than javelins. This means you need to select your targets with
care and discretion or you will waste the fantastic opportunity presented by
this unit. If some troublesome knights are bothering you or heavily armoured
units are giving you nightmares just send in the jinetes and in a few volleys
your troubles will be over. That is assuming you support your jinetes properly.
Unlike the other units in this category jinetes really need the aid of a pinning
unit to hold their target in place, giving them the time they need to aim and
throw without being mown over. Jinetes are also very capable light cavalry so
when their javelins run out switch them to the tactics outlined in the light
cavalry section below. You can use jinetes in both the speedy and weak and the
slow and tough styles without too many problems; they are a very flexible unit.
With their light armour, speed, and flexibility this unit is made for
desert warfare so take them with you when you go into the dunes.
Turcoman horsemen
Charge 2 Attack 1 Defence 0 Armour 2 Speed 9, 24, 26 Morale –1 Cost 300
Support cost 40
Dismount: In a siege for Turcoman foot.
Turcoman horsemen have a small shield. They are a bit feeble but not nearly as
weak as the standard horse archers. Try to keep them out of the hand-to-hand
fighting and always keep a close eye on their morale, as they are likely to
break and run without much provocation.
Turcopole
Charge 2 Attack -1 Defence 1 Armour 3 Speed 9, 24, 26 Morale 0 Cost 300 Support
cost 40
Dismount: In a siege for archers.
Turcopoles have a small shield. Once again this is not exactly a fantastic unit
so just take advantage of their speed and missiles, keeping them out of
close combat. Their morale is juts about tolerable but you still need to keep a
watch on them.