To make life easier I will split this section into three, with one section
each for normal bows, crossbows and gunpowder. This is because these missile
weapons are significantly different in the way they are used and what they are
capable of. There are some general points that apply to all ranged units,
firstly the higher up the unit is the longer the range and the more deadly their
missiles, so always put ranged units on high ground if you have the chance.
Secondly rain affects the range and accuracy of most weapons (normal bows and
crossbows and gunpowder, arbalests have metal strings so they escape this
penalty), wind reduces accuracy by blowing missiles off course. Gunpowder has
more specific weather problems, which are noted in its section.
A small note that applies to all missile units (including javelins, mounted
missiles, naptha throwers – the whole lot) valour increases accuracy. The
difference per level of valour is only slight but it is there. If you keep using
valour 0 missile troops don’t be surprised by their relatively low kill
counts. Firstly make sure you use them correctly (pick the correct targets etc),
secondly make sure they have skill (get them valour, just a few points makes a
difference) and you should be able to turn the enemy into a pin cushion every
time.
Normal bows
This category includes the standard short bows used by most archers and the
longbows used exclusively by the English longbowmen. None of the archers in this
category, with the exception of the longbowmen, are armour piercing so they are
much less effective against armoured targets. Longbows have a slight armour
piercing effect, they are not as effective as crossbow types, but they will do
respectable damage when faced with armoured targets. When they are used against
unarmoured targets (for example peasants, militia or plain spearmen) archers are
quite effective as long as the target is not moving. Archers have difficulty
hitting moving targets, especially when the target is moving quickly so you
should try to target stationary or slow units where possible. Using archers to
shoot at galloping cavalry is a futile exercise that will only waste your
arrows. Normal bows shoot in an arc, this is their strong point as it enables
them to stand behind friendly units and fire over their heads with slightly
reduced accuracy if they are not on a slope with a clear view above the unit’s
heads. The firing arc also allows them to shoot over obstacles like uneven
terrain that can block missiles travelling in a straight line.
Normal bows possess the highest rate of fire, an archer using a normal bow can
release a couple of shots in the time it takes a crossbowman to shoot one, and
they can release three or more shots in the time it takes to reload a gunpowder
weapon. All archers have exactly 28 arrows in their quiver. When you are
defending you can use multiple units of archers to lay down a hail of arrows
that will kill the advancing enemy and reduce the morale of the survivors. This
tactic works best in the early game when there are fewer armoured units, if you
can place your archers on a hill or mountain they will be even more effective as
height increases both their range and killing power. If you need to defend a
bridge then you should pack several units of archers at the minimum, the enemy
get all bunched up when they try to cross the bridge making them an excellent
target for missiles. In a bridge battle missile units reign supreme. When you
are attacking you can use several units of archers to skirmish and try to draw
the enemy out of position, if the enemy have ranged units then you should place
your archers in the loose formation and try to get them on the best high ground
available to give them some protection against the defending archers who are
often well dug in on a good hill.
To draw the enemy out of position you need to shoot at the unit you want to draw
and start causing casualties, once men start dying the enemy will either decide
to weather the storm or to move and attack you. If they choose to stay put then
you should keep shooting, if they move to attack then you should pull your
archers back and send in good melee units to cut the enemy unit to pieces as
quickly as possible before it can withdraw or get support from other enemy
units. Generally speaking most archers are rubbish in a melee, however there are
several very worthy exceptions to this and they are noted in the unit
descriptions. Because of their low combat ability you should try to keep your
archers far away from hand to hand unless you are very desperate for more bodies
to throw at the enemy. You should try to use up all a units arrows before
sending them into a melee, this allows you to cause maximum damage and use up
all your valuable ammo instead of losing it on the body of a dead archer. Foot
archers have an inherent advantage against their mounted counterparts as they
have both better accuracy and superior range when compared to the mounted
missile units. The horse of a mounted archer also provides a bigger target
making it even easier for an infantry archer to kill the mounted version. For
maximum effect most archers should be left on fire at will, if you let them
choose their own targets they will wait until they have a good chance of hitting
the target as well as making sure there are no friendly units at risk of getting
an arrow in the back. On some occasions you may need your archers to shoot at a
specific target, for best results you should put them on hold position. This
prevents them from running off after their target or altering their alignment
and making themselves vulnerable to flank attacks as well as disrupting your
army’s formation. For the most part you should take your archers off skirmish
as they cannot pull back fast enough to stay safe, I generally put my archers on
hold formation to stop them engaging in melee if the enemy get too close (i.e.
if you have the archers behind a unit of spears the archers will stay back and
keep firing if they are on hold formation. If the archers were on skirmish they
would pull back and if they were on engage at will they would probably charge
into the melee.).
Archers are considered to have a clear view of their target (a clear view aids
accuracy substantially) if they are deployed in ranks of two or less in close
formation. If they are deployed in more than two ranks in close formation the
ranks behind the second one will shoot with reduced accuracy. If the unit is in
loose formation it can be deployed in three or less ranks before the men at the
back start getting their view blocked. Having units stood in front of archers
will reduce their view and consequentially their accuracy; therefore you should
always try to deploy your men on a slope so the archers will be slightly higher
up than the other men giving them a clear view.
Normal bow units are best at: killing unarmoured units, damaging enemy morale
with both casualties and arrow fire, bulking up a defensive army and using the
advantage of height to kill the attacking enemy, drawing out defending enemy
units, killing enemy ranged units in a ranged duel, massacring enemy units
trying to cross a bridge, killing the enemy before they reach you and thereby
reducing friendly casualties from melee combat, dealing with mounted missile
units.
M4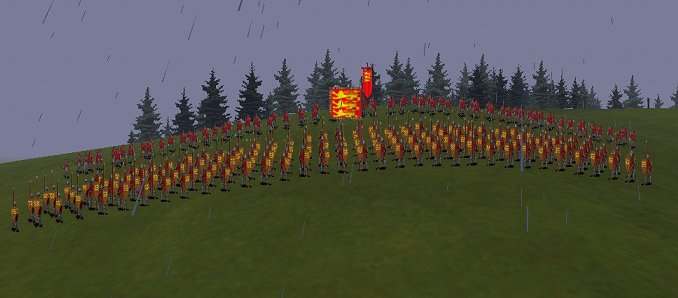
M5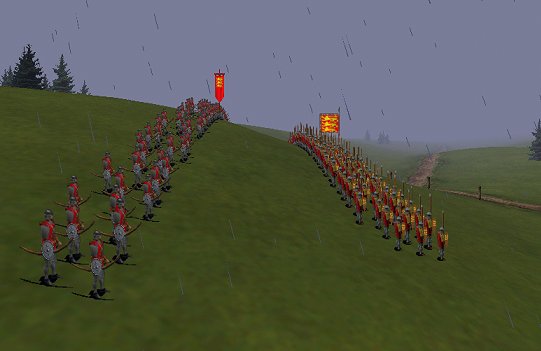
Images M4 and M5:This unit of archers has been deployed so it can
shoot over the heads of the spearmen without receiving an accuracy penalty
because they are higher up than the spears and this gives them a clear view. The
spears will protect the archers and the archers can provide ranged support
without needing to move to a safer position.
M6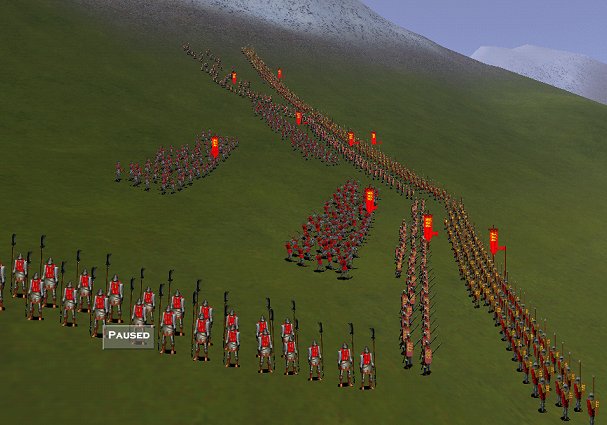
Image M6: This unit of archers is deployed in a four rank deep
formation. The rear two ranks are hit by the accuracy penalty but there is an
advantage to this deployment in very specific situations. Because the unit is on
a very steep slope (a mountain) all four ranks are able to shoot – on flatter
ground sometimes the rear ranks will not do anything. The compact formation
allows them to focus their firepower on a specific target area, longer
formations sometimes only have one half of the formation shooting because the
other half is out of range. With this compact formation all the men will be
shooting at once so you get more arrows in the air, albeit with less accuracy.
Use this formation when you have a nice steep slope and really need more arrows
in the air now.
Crossbows and Arbalesters.
The difference between crossbows and arbalests is quite small but very
significant. Arbalests have a longer range, more killing power and better armour
penetration making them much more deadly than plain crossbows. Although they are
different they operate in an identical manner and will be referred to from here
on as crossbows. Unlike normal bows crossbows cannot arc their fire, this leaves
them unable to fire over obstacles or the heads of friendly troops. If crossbows
are placed behind friendly troops on flat ground they will shoot individually
with reduced accuracy through any gaps in the friendly unit, this is because
they will not shoot through friendly men unless you order them to. In the
unlikely event that you are mad enough to order them to open fire in a situation
like this they will mow down the friendly unit by shooting them in the back. If
you can place your crossbows on a slight slope they will be able to fire over
the heads of the friendly units without many problems, it only takes a tiny
height advantage to allow them both a clear view and a clear shot. You will be
able to tell when your crossbows have enough of a height advantage if you look
closely, there should be a small patch of empty ground between the units when
viewed from the front. If there is no open ground then you are in danger of
shooting the front unit in the back. See pictures F, G, H and I below for a
demonstration of this principle.
Crossbow units should be deployed into two ranks if they are in close formation
to ensure that all the men get a good view of their targets. If the unit is in
loose formation you can deploy into ranks of three before the men at the back
get an accuracy penalty. Like their normal bow using counterparts it is best to
place crossbows on fire at will and take them off skirmish, since crossbows fire
much slower than normal bows they are not exactly good skirmishers anyway as
they will only get one, two shots at the most before they have to pull back. If
crossbowmen have to move during the reloading process they will have to start
from scratch next time they try to fire – they cannot reload on the move and
if you don’t remember this you can spend a lot of time waiting for them to
shoot, only to move them again before they shoot and slowly becoming frustrated
because they won’t shoot at the enemy. Because they fire armour piercing
missiles crossbows are devastating against heavily armoured units like knights,
they can quite literally kill the entire front rank of a formation in just one
volley (but this is a rare event so don’t expect results like this every
time). Even when they don’t kill the entire front rank crossbows tend to do
plenty of damage because they are more accurate then normal bows and the
missiles are more lethal in the first place (they have a higher kill chance).
If you are attacking you can still use crossbows to draw the enemy out of
position and if you are anticipating a ranged duel crossbow units have an
advantage that normal bows and gunpowder do not – there is a pavise version of
each unit. A pavise is a man-sized shield behind which a crossbowman can hide
while he reloads his weapon. This makes them very hard to kill with missile
weapons and can give them a significant advantage in a missile duel if their
opponent does not possess a pavise. However the pavise does slow the
crossbowmen’s movement down considerably, so you will want to avoid them in
situations that require mobility. For more on the difference between pavise and
non-pavise crossbowmen read the relevant sections below (crossbows, pavise
crossbows, arbalesters and pavise arbalesters). Crossbow units have exactly the
same amount of ammunition as normal bows (28 quarrels) but it will last much
longer due to their slower rate of fire, this enables them to keep shooting long
after normal bows have run out of arrows. Crossbow units have the same advantage
against mounted missile units as normal bows; in fact they are even better due
to their longer range and higher accuracy and killing power. Crossbow units are
the unit of choice for disposing of troublesome mounted missiles.
Crossbow units are best at: Killing armoured units, inflicting high amounts of
damage on enemy units, inflicting the morale penalty for missile fire on enemy
units, defending a strategic location (e.g. bridge) for long periods of time,
drawing enemy missile fire without taking much damage (as long as you are using
the pavise version of the unit), luring the enemy down from a defensive
location, reducing the number of enemy that reach hand to hand with your troops,
dealing with mounted missile units, providing a relatively cheap way to kill
powerful units like knights.
M7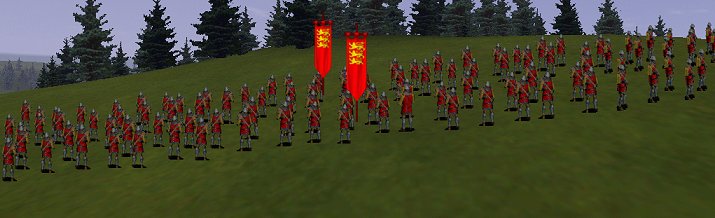
M8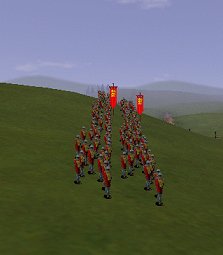
Images M7 and M8:These crossbows are deployed badly – the second
unit will shoot the first in the back.
M9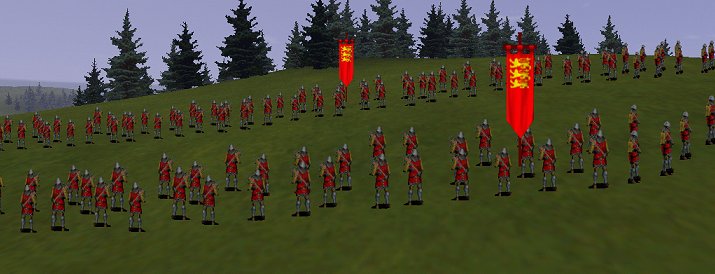
M10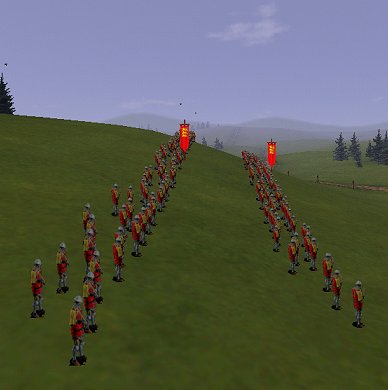
Images M9 and M10:With a tiny adjustment both units receive a clear
view and the second unit is not going to shoot their comrades in the back. This
is a small difference in deployment but it is vital to master if you want to use
these units well.
Gunpowder units.
Gunpowder units are very different to the other missile units and not exactly in
a good way. Firstly they have a very short range; they can improve their range
by standing on high ground but generally speaking the enemy must be very close
before the guns can open fire. Secondly, they have very low accuracy, it is not
uncommon to watch a unit of 80 arquebusiers fire three volleys into a unit of
133 men and only kill two or three men. Thirdly, they have serious problems with
the weather, heavy rain or falling snow will stop them from firing because the
primitive gunpowder gets wet. In lighter rain or falling snow the units will
fire at an even slower rate than usual. Fourthly the guns take a long
time to reload so unless you arrange them carefully you will often only get one
volley before the enemy are on you. Gunpowder units do have some advantages and
proper usage can alleviate their problems a little but you should never consider
gunpowder a replacement for more conventional bow and crossbow weapons. At best
they are a useful novelty that should be used in small numbers and in specific
circumstances, at worst they are a liability and a waste of space.
To improve the rate of fire you must deploy the gunners in ranks of three or
more as this will force them to use a revolving reload system where the front
rank will fire before retiring to the rear to reload leaving the man behind to
fire his weapon before the process repeats. This speeds up the rate of fire
considerably although it still takes a few seconds for a man to prime his weapon
upon reaching the front rank. Three ranks is the most efficient balance between
speed of fire and maximum number of shots per volley. If guns are deployed in
one or two ranks they will fire one massive volley before taking a long time to
reload, you should never use your guns in this way.
Accuracy is a more important, and harder to fix, problem. Valour helps slightly
so try to use guns in an army commanded by a good general and build them in a
master gunsmith, or in custom battles you should buy them several levels of
valour. Valour is only a slight fix, you should also try firing at close range
to maximise the chance of hitting something so use a junk unit to pin the enemy
in place before flanking with a unit of guns and firing into their rear at close
range. Pinning an enemy like this also counteracts the gun’s short range.
Gunpowder does have some advantages, it causes fear in units so units that are
under fire from a gun unit get two penalties one for being under fire and one
for being shot at by gunpowder. Secondly gunpowder units take even longer to use
all their ammo than crossbows, which enables them to last a long time even
though they only have 10 rounds per man. Honestly I can’t really recommend the
use of gunpowder troops apart from the Catholic hand gunners and I only
recommend them because they are good melee swordsmen who benefit from firing a
single volley into their enemy before charging.
M11
Image M11:These arquebusiers have been run around the enemies flanks so they can fire into the rear of the pinned unit.
Archers.
Charge 1 Attack –1 Defence –2 Armour 1 Speed 6, 10, 11 Morale –1 Cost 225
Support cost 37
Archers are the simplest ranged unit in the game. They are the most basic and
have no advantages like shields so you should use a more specialist type of
archer (i.e. one with a longer name) whenever there is one available. The basic
archer is still very useful as a ranged unit although you should never send it
into a melee as they really cannot hold their own. Archers have low morale so
you need to keep a close eye on them if your units start routing or if the
archers start to get into a disadvantageous position.
Bulgarian brigands.
Charge 1 Attack 2 Defence 0 Armour 2 Speed 6, 12, 13 Morale 0 Cost 300 Support
cost 30
Bulgarian brigands are slightly better at hand-to-hand combat than the standard
archer as well as being faster and having slightly better morale. The fact that
they are fast for infantry allows this unit to skirmish more effectively than
many foot based ranged units, as there are only a handful of melee infantry
units capable of catching the speedy brigands. Because brigands still have low
morale you must be careful to stop them getting surrounded or skirmishing
themselves into a morale damaging position as it is likely they will loose their
nerve and run away if this happens. Bulgarian brigands are not very good in a
fight but they can cause some damage if they charge from a flank or the rear and
they should be able to hold their own against most infantry units for a short
time, allowing you to send aid. They have a small shield.
Desert archers.
Charge 1 Attack –1 Defence -2 Armour 1 Speed 6, 12, 13 Morale 0 Cost 250
Support cost 37
Desert archers are faster than standard archers which allows them to skirmish
effectively, just like Bulgarian brigands. Desert archers also have slightly
better morale but they are still likely to flee the field if things get hairy,
and just like Bulgarian brigands you must watch them while they skirmish to
prevent any unfortunate morale problems. They have a small shield.
Genoese sailors.
Charge 1 Attack 0 Defence –2 Armour 1 Speed 6, 12, 13 Morale 2 Cost 275
Support cost 30
Genoese sailors are slightly better in a melee than plain vanilla archers
because they have one point more in attack. They are also faster than ordinary
archers and this allows them to skirmish effectively with other infantry units.
They have a small shield.
Golden horde warriors.
Charge 2 Attack 3 Defence 0 Armour 2 Speed 6, 10, 11 Morale 2 Cost 300 Support
cost 22
Golden horde warriors are disciplined, which makes them very valuable in a fight
where things are going badly. Routing units, unless they are also disciplined or
elite, will not affect their morale. The death of your general will have less of
an impact on this unit’s morale. Golden Horde archers also have a large shield
to protect them from missiles; this makes them very handy in a ranged duel if
you have no pavise units. If this unit is not already appealing enough they are
very good light infantry and capable in a melee. This is one unit of archers
that can kill effectively at both long range and close up.
Hashishin.
Charge 2 Attack 6 Defence 5 Armour 2 Speed 6, 12, 13 Morale 12 Cost 500 Support
cost 15
Hashishin have 12 men per unit. They come with a small shield to protect them
from missiles and they are very deadly in melee combat. The major problem is
that there are only 12 men total – this means they often get pulverised by
weight of numbers before they can do much damage. To get maximum benefit from
this unit you need to remember their other, special talent – they can hide
anywhere on the battlefield, not just in trees like everyone else. This enables
you to set ambushes and run this unit behind enemy lines to snipe at the
general. Since they are good in melee combat you can charge your Hashishin into
the rear of an enemy unit that is already engaged to cause significant damage
without risking them being outnumbered and slaughtered. You should try to train
Hashishin up a few valour levels by killing peasants and other easy targets;
because there are only 12 men they will level up quickly. After gaining several
valour levels they become much more deadly and can take on larger, tougher units
like the enemy general without too many problems. You should remember that they
will become visible the moment they move so you should take them off skirmish
when using them to ambush.
Janissary archers.
Charge 1 Attack 1 Defence 0 Armour 2 Speed 6, 10, 11 Morale 4 Cost 275 Support
cost 52
Janissary archers are both disciplined and elite. This makes them very reliable
when things get hairy, as only other elite units will affect their morale by
routing. Janissary infantry can act as a capable set of flankers after you run
out of arrows because they have high morale and tolerable melee stats, however
this is not their best use and they should only be used like this in
emergencies. They have a small shield.
Janissary infantry.
Charge 1 Attack 4 Defence 2 Armour 3 Speed 6, 10, 11 Morale 4 Cost 350 Support
cost 52
Janissary infantry are elite, disciplined and generally a very scary set of men.
Like the Golden Horde warriors they can kill effectively at both long and short
range, they make brilliant flankers and can be used as a reserve to plug gaps in
your line or intercept new threats to your flanks. They have small shields to
improve their survival rating. Because they have high morale in addition to
elite and disciplined status they will take a heck of a lot of misfortune before
they rout. When you can use Janissary infantry you have no real reason to use
any other infantry based archers unless you are very short of cash.
Ottoman infantry.
Charge 2 Attack 1 Defence 0 Armour 2 Speed 6, 10, 11 Morale 0 Cost 275 Support
cost 37
Ottoman infantry have a small shield that makes them valuable in ranged duels if
there are no pavise units. They have similar melee stats to the Janissary
archers so they can do some melee fighting but they won’t be outstanding at
it, although they will do better if they face armoured opponents – this unit
has an armour piercing attack. Even so they are just pepped up standard archers
and should be used as such, with an emphasis on fighting armoured opponents
rather than unarmoured ones.
Trebizond archers.
Charge 1 Attack 3 Defence –2 Armour 1 Speed 6, 10, 11 Morale 2 Cost 275
Support cost 52
Trebizond archers are disciplined and have a small shield; they also have a high
(for an archer) attack so they can kill other units surprisingly quickly in a
melee. At the same time they will die quickly due to their low defence, however
the shield does alleviate this problem slightly.
Turcoman foot soldiers.
Charge 1 Attack –1 Defence 2 Armour 3 Speed 6, 12, 13 Morale –1 Cost 300
Support cost 30
Turcoman foot have a small shield alongside reasonable defence and armour. This
makes them quite tough for simple archers. They are also fast and these two
facts combine to make an effective skirmisher who excels in a ranged duel.
Turcoman have low attack values so they should stay away from melees as much as
possible. If you send your Turcoman to skirmish you must remember to watch them
more carefully than usual as they have a very low morale and it won’t take
much for them to rout while skirmishing. Turcoman foot also possess a
‘rabble’ formation – no matter what you tell them to do they look like a
rabble. This makes them harder to hit with missiles because the men are strung
out and disorganised but at the same time it can make them harder to include in
tight formations with other units. This unit is one of the best pure archers.
Crossbow.
Charge 1 Attack –1 Defence 2 Armour 3 Speed 6, 10, 11 Morale 0 Cost 200
Support cost 22
Crossbows are the first unit available to use the armour penetrating crossbow
type weapon. This is both their advantage and their disadvantage. It is their
advantage because there is no one else who can do their job until the appearance
of arbalesters. It is a disadvantage because arbalesters are available only a
few short turns after the crossbowmen appear. In multiplayer and custom battles
the two units are always available together. The thing is arbalesters are
everything crossbows are and then some – they can do everything crossbows can
and they do it far better. There is only a small price difference between the
units and arbalesters really do provide enough extra bang for that buck. This
means that you should always take arbalesters over crossbows when offered the
opportunity. Crossbowmen are poor in melee combat, have low morale and are not
very speedy so you should keep them safe and well protected and let them snipe
away at the foe.
Pavise crossbows.
Charge 1 Attack –1 Defence 2 Armour 3 Speed 4, 8, 9 Morale 0 Cost 225 Support
cost 22
Pavise crossbows are the anti-missile version of normal crossbowmen. The giant
pavise shield makes them almost immune to missiles so they are the unit of
choice when it comes to ranged duels. The pavise is so heavy it slows the bearer
down making this unit ineffective at skirmishing and manoeuvring quickly.
Otherwise this unit is exactly the same as a normal crossbowman.
Arbalesters.
Charge 1 Attack –1 Defence 2 Armour 3 Speed 6, 10, 11 Morale 0 Cost 275
Support cost 22
Arbalesters are crossbows +1. Statistically speaking they are identical –
arbalesters are just as bad in a melee as their lesser counterparts. The real
difference is in the ranged weapon. Arbalesters use a larger, stronger crossbow
with a steel string. This means that the wet weather doesn’t reduce their
accuracy, as well as making each shot more powerful. Arbalests also have a
longer range, more killing power, and more armour piercing power – this makes
them deadly.
Pavise arbalesters.
Charge 1 Attack –1 Defence 2 Armour 3 Speed 4, 8, 9 Morale 0 Cost 300 Support
cost 22
Pavise arbalesters are arbalesters with pavise shields. In function they are
exactly the same as pavise crossbowmen but they have the advantage of the more
powerful arbalest crossbow.
Longbowmen.
Charge 1 Attack 3 Defence –2 Armour 1 Speed 6, 10, 11 Morale 4 Cost 350
Support cost 45
Longbows have a small shield and they use a unique bow – the long bow. This is
the only standard bow with anti-armour capabilities; while it may not be as good
against armour as an arbalest, or even a crossbow, it will prove effective
against most targets. In the original release of MTW these guys fired faster
than ordinary archers but in 1.1 and onwards they fire at the same rate. Against
unarmoured units like peasant longbows will perform at the same standard as
ordinary shortbow equipped archers, therefore you should always try to target
armoured units to get maximum usage from them. Longbowmen also have the
‘rabble’ natural formation making them harder to hit with missiles and
generally look untidy!
Handgunners.
Charge 1 Attack 1 Defence 3 Armour 4 Speed 6, 10, 11 Morale 4 Cost 200 Support
cost 30
Handgunners are one of the better gunpowder units because they are also very
handy swordsmen. If there is a melee you can rely on your handgunners standing
their ground unless they are facing cavalry. The guns they use have incredibly
short range and are very inaccurate, the unit will often only get one shot
before the enemy reaches and engages them. Because of their short range the
enemy are often very close when the unit fires – this does compensate for the
poor accuracy to some extent. The best way to use handgunners is as swordsmen
with the benefit of firing a single volley before charging. Therefore you should
put them in two ranks and on hold formation (skirmish will let them pull back
before doing any good, engage at will risks them charging prematurely), have
them fire one volley at the enemy before switching them to engage at will and
ordering them to charge. Alternatively you can put them in three ranks and hold
formation before using them to run around the enemies flanks and firing a few
volleys before charging (once again switch to engage at will before the charge
for maximum efficiency) into the stunned enemies rear. Remember that gunpowder
will apply a –6 penalty to morale if a single casualty is caused in a unit,
therefore all your handgunners need to do is kill one man before charging to
stand a good chance of breaking a unit shortly after impact.
Mamluk handgunners.
Charge 1 Attack 0 Defence –2 Armour 1 Speed 6, 10, 11 Morale 2 Cost 100
Support cost 30
Mamluk gunners are no where near as good as their western counterparts. They are
rather rubbish in combat and they have the same dodgy handgun complete with
short range, slow rate of fire and long reload times. Put them in three ranks on
hold formation, run them around the enemies flanks and let them fire into the
rear, there is little else you can do with them.
Arquebusiers.
Charge 1 Attack –1 Defence 3 Armour 4 Speed 6, 10, 11 Morale 0 Cost 175
Support cost 22
Arquebusiers are a slight upgrade from handgunners in one sense but at the same
time they are a significant downgrade when compared to the western
handgunners’ melee capabilities. Like the Mamluk handgunners arquebusiers are
no good in a melee and should stay well out of it. To get the best usage out of
your arquebusiers you should put them in hold formation and three ranks before
sending them around the enemy’s flanks and shooting the foe in the back.