STW War Story Part V
Furinkazan - The Ambition of Takeda
Wind (1)
|
Spring 1530 |
|
|
The
Takeda clan, led by its competenet yet somehow un-popular daimyo Takeda
Nobutora, was surely a formidable force of Chubu (central region), Japan.
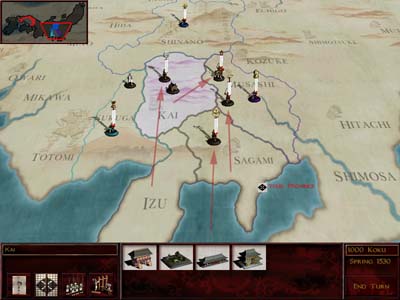
When the year came to 1530, Nobutora suddenly decided to abandon their western provinces in Chugoku (the central countries) of Bitchu, Bingo, and Aki. All Takeda forces should focus on the east, where the richer land is. There is no way to prevail against the rich eastern clans without the reinforcement from the west. Now, Takeda started its campaign towards the east. Nobutora's first target was Hojo Ujisuna - the richest clan of Japan at the time. All available forces in Kai and Sagami marched into the province of Musashi! |
 |
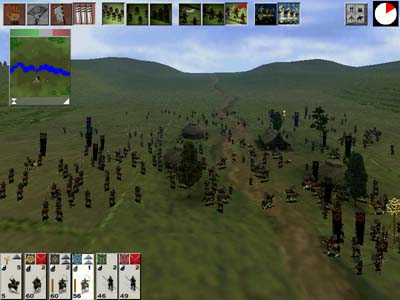
Musashi :
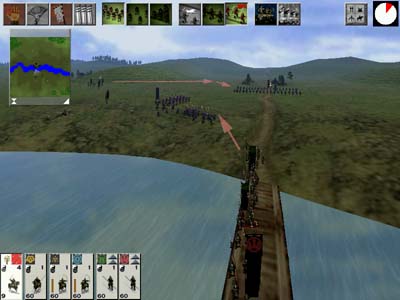
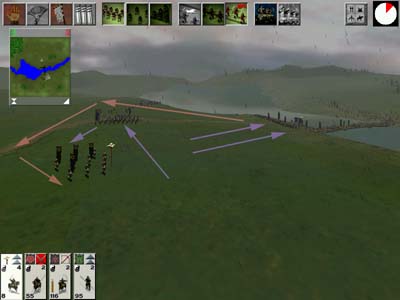
With a good numerical advantage, Lord Takeda made up a bold plan. He made himself a bait - crossing the bridge first hoping to attract the enemy's attention. The distraction will soon create a gap in the enemy's defense - then the Takeda army could cross the bridge easier. The Takeda army was consisted of a large number of cavalry, while the enemy has mainly yari soldiers for defense. Therefore, Nobutora's bold plan did have some good points. If both army clash at the bridge's front, Takeda must suffer a heavy loss. |
 |
As
planned, the Hojo army would not want to miss the chance to capture the
Takeda daimyo - but their yari samurai's speed was no match of that of
Takeda daimyo's elite heavy cavalry.
The enemy archers were busy aiming at Nobutora as well, but Nobutora's swift action had let his men dodged most of the arrow fires. At this moment, the Takeda yari samurai started to cross the bridge, and soon engaged with the panic Hojo yari samurai who rushed back to defend the bridge. |
 |
With the superior speed, soon the Takeda army
reached the other side of the river. In a short time, the
Hojo yari samurai who attempted to block the bridge turned around and
routed.
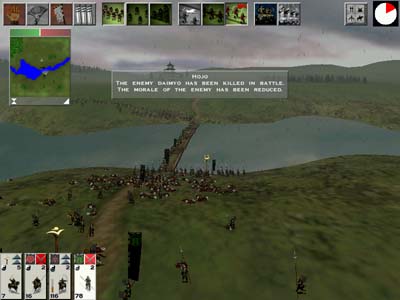
The Takeda lord was indeed brave and bold. He charged into the Hojo archers (taisho's unit), so the enemy archers now become too busy to shoot at Takeda's men on the bridge. The enemy taisho now knows he had no chance to prevail - and sounded a retreat order. |
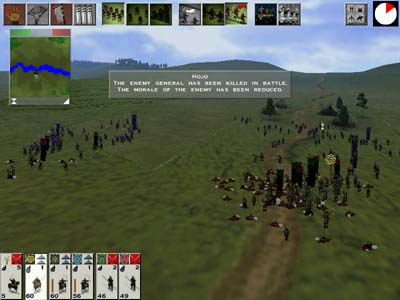 |
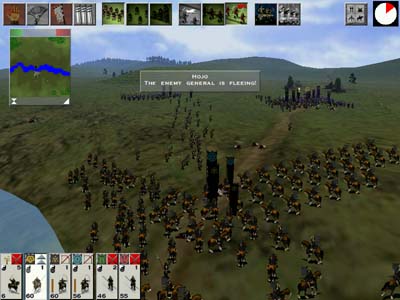
However,
it was too late to flee. The enemy taisho was killed by the Takeda
cavalry. The Hojo army fell into a complete chaos.
The speed of Takeda cavalry was far greater than the Hojo's men - although they already tried their best to run! |
 |
Most
of the Hojo soldiers did not reach the exit of the battlefield. The speed
of Takeda cavalry has been utilized to the full extent.
Corpses spread all the way - marking the success of Takeda Nobutora's bold strategy. |
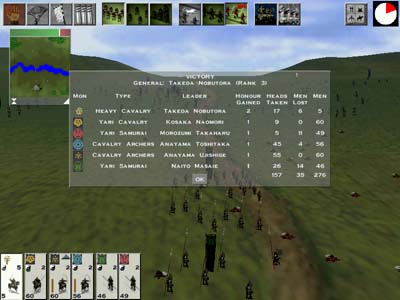 |
157
out of 180 Hojo soldiers were dead, while Takeda only lost 35. This was rare in attacking river province battle.
Had the Takeda chose a frontal assault directly, the casaulty might be much higher than this. Yet Nobutora might as well lost his life being a bait... |
|
Summer 1530 |
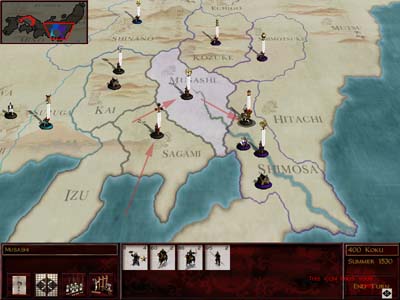 |
With reinforcement
from the west flowing into the port in Sagami, Takeda Nobutora launched
the second attack to Hojo right in the next season.
This time his target is Shimosa. If Shimosa is taken, then all of Hojo's troop generation will be lost for the coming 6 seasons (just theoretically), and Takeda can easily defeat Hojo Ujisuna. |
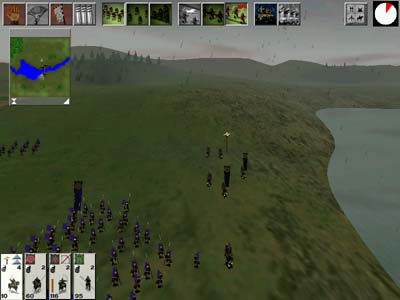 |
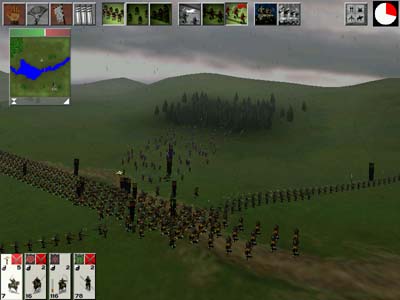
Shimosa : Noticing the devastating outcome if Shimosa is lost, Hojo Ujisuna arrived in Shimosa to command the defense himself. Takeda Nobutora led exactly the same army that he taken to Musashi in spring. He even used the same tactics - since right the Hojo soldier probably did not expect the Takeda daimyo would cross the bridge first once more! Yet he did. A large number of Hojo ashigaru (120) was dragged after Nobutora, and at this very moment the Takeda cavalry charged across the bridge! |
 |
Takeda Nobutora
skillfully ran past the Hojo ashigaru, and the rest of 71 Hojo men,
archers (60) and daimyo's bodyguard and daimyo himself (10 + 1), were forced to block the bridge!
The cavalry archers of Takeda were ordered to fire at well, and the yari samurai rushing forward to help the cavalry. |
 |
Hojo Ujisuna's leadership brought a hard time
to Takeda Yari cavalry on the other side of the bridge. However,
with their supreme speed, the Takeda daimyo suddenly appeared behind the
Hojo army.
The Hojo's morale suddenly dropped and the Takeda started to advance. And now the Takeda cavalry archers are ready to charge over! |
 |
Hojo's archers routed in a short time. Hojo Ujisuna was surrounded by the spears of Takeda
yari samurai, and finally he was stabbed from behind.
The remaining Hojo archers tried their best to flee - but the Takeda cavalry soon followed up. None of them made it to the exit. The death of the their daimyo made the Hojo ashigarus greatly shaken - and they could only hide inside a forest, praying the Takeda would not find them... But Takeda Nobutora had observed these all. |
 |
With cavalry archers
lining up shooting at them, and yari samurai blocking their way of return, the poor peasants
of Hojo could only attemped to charge across.
Of course they failed. A massacre began - yet many of the peasants fled in the opposite direction - so still 41 of them made their way home. |
 |
With the same bold tactics, Takeda Nobutora took not only Musashi and Shimosa, but also the head of Hojo Ujisuna. Takeda Nobutora's campaign agnist Hojo only lasted two seasons - swift as wind. |
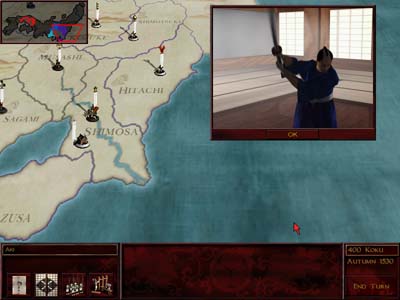 |
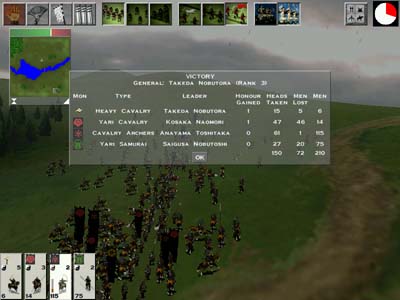
In the battle of
Shimosa, one of Takeda's yari cavalry (#38) killed 5 enemies. He was
granted the title of a legendary swordsman.
He could now become a teacher in sword dojo. However, with the strong cavalry, Takeda probably does not need No-Dachi samurai this much... In the same season, the defenseless Bingo province of Takeda was taken by Mori. Mori only ordered a small army to occupy it - maybe the loyalist of Takeda will not be too happy. So what will be Takeda Nobutora's next target? The swift wind might blow further north...! |