Guides.
3. The battle map
3.1 Basic aims
-When attacking
-When defending
3.2 Unit types
-A quick rundown of what is what and a link to a
source of more detailed information
-Morale
-What are those little flags visible on each unit?
-Charging
3.3 The landscape
-Height
-Trees
-Bridges
-Desert
3.4 Generals and kings
-Killing and preserving
3.5 When to fight and
when to withdraw
-Running for it with
grace! Know when you cannot win and when you can win
3.6 Sieges
-Both defending and attacking strategies
3.7 Tactics and fighting styles
-Catholics
-Muslims
-Orthodox
3. The
battle map
This is the most spectacular, and in my opinion, the most rewarding part of the
game. The degree of realism and importance of tactics is nearly unmatched by any
other game out there. The battle mode can stand alone as a whole game, which
would be worth paying full price for. Unfortunately for the beginner it is even
more complex than the campaign map. The first thing you should do is play the
tutorials as they will give you a grasp of the basics. After you have finished
all the tutorials you should play custom battles with different factions and
units as both the attacker and defender. This section of my guide will give you
the basic knowledge you will need to win battles. It won't teach you any really
advanced stuff; there are links for that kind of thing at the bottom. I will not
go into the stats behind combat, as it is too complicated for this guide.
Instead I will just note bonuses and penalties.
Back to top.
3.1
Basic aims
You might think that the only aim of the battlefield is to win; if you think
this then you are wrong. There are more ways to win than killing your enemy. For
example you may be attacked in the campaign game by a superior army, which you
cannot hope to beat. A fighting retreat will cause some damage to the enemy
without getting you pulverised. As long as you cause a lot of damage without
taking many losses this is a victory. The highest form of victory on the
battlefield is gained without spilling a drop of blood. If you position your
troops correctly and drive the enemy back by out manoeuvring them they will
eventually withdraw from the battlefield, you win without fighting. However
generally speaking the aim of a battle is to kill enough of the enemy to cause
the army to rout off the field leaving you the victor. Whether you are attacking
or defending in the battle will alter your aims.
Back to top.
When attacking
The main aim of the
attacker is to manoeuvre his army so as to force the defender to abandon their
position before the fighting begins. When they have been forced onto lesser
ground you should engage them and try to cause as many casualties as possible
while being careful not to lose too many yourself.
Back to top.
When defending
When defending the main aim is to stay on the high ground, keeping the advantage
and using it to defeat the enemy without taking many losses.
Back to top.
3.2
unit types
Total War uses the old rock -> paper -> scissors style of each unit being
strong against one kind and weak against another. You must learn this formula if
you want to win.
*Spears beat cavalry
*Cavalry beat swords
*Swords beat spears
*Archers beat anything that is at a distance but lose in close fighting.
*Foot ranged units beat cavalry ranged units as they are more accurate and have
a longer range.
*Camels beat horses.
There are very rare
exceptions to this rule. For example some archers are good in hand-to-hand
combat, like the longbowmen or Janissary infantry. Cavalry can beat spears if
they charge them from behind and cause the unit to scatter, losing the bonus
spears get from ordered ranks. Generally as long as you use common sense you
will know when a unit stands a chance of beating its counter. To find out which
archers are good in hand to hand fighting look at their stats in the unit tool
noted in chapter 1.1, or check their entry in the unit
guide. Any archer with 2 or more in attack will do reasonably in hand to
hand, although you shouldn't expect wonders as melee is only their secondary
job.
Each unit type has an optimum deployment type:
-Spear armed infantry
= a minimum of three ranks deep, preferably four. All spearmen get a bonus (+1
defence, +1 charge for each supporting rank and +1 attack for every two ranks).
Spearmen can only receive support from two ranks; therefore they get the full
bonus only when deployed in ranks three rows deep. The forth row supplies
reinforcements so the unit can take losses without losing its fighting power too
quickly.
-Pike armed infantry = they get the same bonus as spearmen, but they also get
support from four rows as their weapons are longer. Therefore deploy them in
ranks six men deep, five at the least.
-All other melee
infantry = deploy them two ranks deep. Only spears and pikes get rank bonuses so
you get better use out of your unit by placing them in a long, thin unit where
the maximum number of men can engage in combat quickly. The longer length of the
line also allows the unit to wrap around its opponents flanks giving it a bonus.
There are occasions where a deeper formation can be useful, mostly when your
unit is about to receive a cavalry charge. Depth gives more resistance to the
charge, making it harder for the cavalry to fragment your unit�s formation.
However these occasions are generally not something you want to be worrying
about as a beginner, the information can be found in the unit
guide when you want it, just look under polearms, swords etc.
-Missile armed infantry = ideally you want these guys in
ranks of two so they all get a clear shot. This increases accuracy. If the unit
is in loose formation you can put them in ranks of three without receiving
accuracy penalties.
-Gunpowder infantry = Leave these guys in ranks of three. They will use a
rotating formation where the front rank fires and then moves to the back to
reload while the next rank fires. They will only do this if they are in three or
more ranks, if they are in two or less they will fire one big volley and take
forever to reload.
-Melee armed cavalry = If your cavalry is going to be fighting hand to hand then
it should be two ranks deep for the same reasons as melee infantry.
-Missile armed cavalry = Ideally they should be in ranks of two, however this is
not always practical as the purpose of missile armed cavalry is to skirmish
which is more effectively done in a compact formation. I use them in ranks of
three, as it is a good compromise between accuracy and manoeuvrability.
As for the engagement
options hand-to-hand units like swordsmen should always be on engage at will, as
should most melee cavalry. Spearmen need to use hold formation to keep their
rank bonus, never take them off this setting. Missile units, both infantry and
cavalry, can use the skirmish setting, which will pull them back from their
target if it gets too close. Skirmish only works on the target not all enemy
units and it can be very unreliable. At beginner level missile cavalry should
use this most of the time, as their speed is good enough to get them out of the
way. Just remember to keep an eye on them at all times
and be ready to take over if they look like they are getting in trouble.
Infantry archers are trickier. If you have them in a protected position you
should turn skirmish off in favour of hold position. This will stop them leaving
the protected position. If the unit is not protected you should probably leave
them on skirmish, but remember that foot units are less effective skirmishers
than cavalry because they are slower. Again this applies to beginner level
tactics, there is quite a lot more to missile engagement modes, but you do not
need to worry about that just yet. As ever the information can be found in the unit
guide when you feel able to expand your horizons.
A special note on the
gunpowder troops: (hand gunners, arquebusiers and Mamluk hand gunners) don�t
bother! The accuracy on these units is so low they will only kill 4 men out of a
formation of 133 in three volleys. They are pathetic. If you want them to have a
use you must mod their accuracy to be better, you can find instructions in
chapter 5.3. Well I suppose they do have some uses in damaging enemy morale, but
that is more advanced than this guide is aiming. I shan�t repeat myself by
saying tactics for gunpowder units can be found in the unit
guide�oh, wait � I just did repeat myself yet again!
Javelin units also need a special mention. If you can use
them effectively they are deadly, however they are one of the hardest units to
use well. Javelins are short-range missiles that go straight through armour,
making them one of the best-ranged units for killing heavy cavalry and generals
until arbalesters come along in 1205. The short range means that any unit of
javelins left on skirmish will never throw their weapon, as the range is below
the safety threshold and they will pull back. So to get any results you need to
take them off skirmish and put them on hold formation (engage at will tends to
send them into melee fighting before using much ammo) and control them yourself.
Attacking head on is not a good idea, you will only get one throw, and if you
are against cavalry you won't even get that. Instead you must send the unit
around the enemy�s flanks once they are engaged with your melee infantry and
order them to throw when they are behind a unit that is already fighting. You
will lose some of your own men to friendly fire so don't do this if you are
using expensive troops to pin the enemy in place. You can also try placing your
javelin units behind your spearmen and ordering them to fire over the
spearmen�s heads. I find I lose more of my own men doing this than I do by
flanking, but you should give both a go and see which you prefer. The key to
using javelins is practise, so load a few custom battles.
A helpful note on
cavalry: To increase your cavalry�s effectiveness when chasing routers don't
order them to attack, order them to move! Double click past the routers so your
cavalry will gallop through them on their way to the destination. This will
cause your cavalry to mow the routers down without stopping, increasing their
effectiveness nine fold! This tactic is less useful when the enemy are not
routing and the effect has been toned down due to the fixing of the so called
swipe bug in patch 2.1, it remains useful
against routers but should not be used against anything in a position to fight
back.
To stand any chance of victory you must use a balanced army. An army of nothing
but knights may look good but it costs a fortune and will be massacred by spears
and pole arms, both of which are substantially cheaper. Make sure you have all
four groups represented in your army: spears, swords, bows and cavalry. When you
get better you can try leaving out spears in favour of something like pole arms
but it takes experience to know what you can swap with what.
For more specific and in depth information on units try looking at the
Complete Total War Unit Guide.
Back to top.
Morale
Morale is the make or break factor in battle. If your morale gets too low your
units will start to run. Each fleeing unit gives a morale penalty to friendly
units that can see it, unless they possess the disciplined or elite status and
the router doesn't. To keep morale high you should act as the tutorial showed
you: Keep your units together, protect their flanks, don't make them turn their
back on an enemy, make sure they are winning without taking too many losses.
There is more on morale in chapter 2.3.
Back to top.
What are those
little flags visible on each unit?
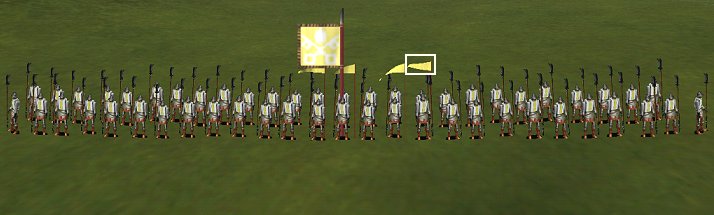
The little triangular flag highlighted by the box represents a single point of
valour. The unit in the picture has four little flags so that tells you the unit
is at valour 4. The single large flag in the middle is the unit�s standard and
represents nothing except the location of the unit�s leader. If the man
carrying the standard gets into a fight the rest of his unit will try to reach
him, generally the standard bearer will try to keep pace with his unit so if
most of the men are engaged in combat he will wander over and join in. If a unit
only has the standard and no other flags this means the unit is valour 0 and
easy pickings.
Back to top.
Charging
A common misconception is that you need to double click on the enemy to get your
unit to charge. This is not true, all you need to do is single click and the
leader of the unit will order a charge within a certain distance of the enemy.
By double clicking you are ordering your unit to run, which is a different thing
from charging. Allowing the unit to walk saves energy and micromanagement, so
for best results just single click and let your officers do the rest.
To charge or not to charge, that is the question. There is no simple answer to
this question, there are times when you should charge and times when you
shouldn't. The basic rule of thumb is charge with everything except spears
whenever they are going to enter combat. This gives the unit its charge bonus
and gives it a better chance of doing damage in the first few seconds of combat.
Spear units are the exception for a good reason - they need to stay in ordered
ranks to receive their rank bonus. Charging disrupts the ordered ranks, even if
the unit is on hold formation. Worse still is the fact that a spear unit will
halt its charge the moment a single man comes into contact. This means that only
one man gets the charge bonus for less than one second, while the formation is
disrupted causing a loss in stats. Spearmen only get a small charge bonus anyway
and their job is to hold the enemy in position while other units do the killing
by flanking. So basically you should charge with everything except spears, until
you can recognise the times where the exceptions to this rule take place.
Back to top.
3.3
The landscape
To find victory you must use and understand the landscape. I will give a basic
rundown here but if you really want to know the tiny details find a copy of Sun
Tzu's 'The Art of War'. This book is the original and best guide to conducting a
war; reading and absorbing its contents will improve your game immeasurably as
Total War was designed around it.
Back to top.
Height
Height is critical. To put it bluntly the person with the high ground has a much
better chance than the one on the low ground. Any unit on high ground gets a +2
morale bonus and attack bonuses against any unit lower than it. All ranged units
gain extra range and damage. Any unit fighting up hill will get penalties and
get tired faster. No matter what you do you should never attack up hill unless
there is absolutely no option. When you are defending you should cling to your
hills and refuse to be drawn down off them. If you are attacking height is much
more tricky. You should try flanking your opponent while remaining out of range.
This can cause them to move to a less advantageous position to avoid being hit
in the rear. If they don't move then you will have some slight reduction of the
height penalties because you will be attacking from several sides. You should
also look for any high ground nearby and try to attack from it, as you will
reduce the height penalty by reducing the height difference.
Back to top.
Trees
Cavalry and spearmen are both at a disadvantage in trees. Cavalry receive a big
penalty and spearmen are prevented from getting their supporting ranks bonus.
Therefore you should try to engage these units in forests if you need to fight
them with unsuitable units like swordsmen. You must keep your own cavalry and
spears out of the forests unless you really want them to die.
Trees also provide cover from missile fire as the trees catch the arrows. Some
arrows will inevitably get through but many will be stopped. If you are fighting
a missile heavy army try hiding in the woods until they use up their ammo.
Putting your own missile units in forests and expecting them to do much damage
is stupid.
You can spring ambushes from trees; this is covered in the tutorials.
Back to top.
Bridges
If you are defending
then a bridge is a fantastic boon. If you are attacking then it is your worst
nightmare. Units can only cross bridges slowly and in single file. This makes
then a big fat target for missiles. When they are coming off the bridge they are
still subject to the penalties for being crowded together. This makes them easy
targets for the enemy's hand-to-hand units. Crossing any bridge is a bloody job,
which will cost many lives. There are ways to reduce this though.
Firstly use units with very heavy armour, preferably above 6. This will protect
them from the missiles better. They will also be able to hang on in the close
fighting on the other side for longer, giving you more time to get extra men
across.
Secondly you should bring your own missile weapons and try to lure the enemy
onto the bridge by sending a rubbish unit like peasants out onto the bridge.
When the enemy sends a unit to attack pull your men back. Hopefully the enemy
will get into missile range and you can shoot them. Keep doing this until you
run out of missiles.
Thirdly you should
know that in MTW the AI will only defend one bridge if there are several in the
map. Send a detachment around to the second bridge to flank the enemy before you
begin to cross.
Fourthly bring plenty of troops; you will need at least 2-1 odds in your favour,
probably more.
Fifthly, on the campaign map, you should send overwhelmingly massive armies to
bridge provinces to try and force the AI with withdraw without a fight. This is
the only way to win a bridge battle without substantial losses.
Defending a bridge is easy. Bring plenty of missile units and some good
hand-to-hand units like men at arms. Shoot the enemy while they are on the
bridge and send in the melee fighters as they are just coming off the bridge.
You will hit them while they are disorganised and still crowded with a penalty
and should be able to do plenty of damage before routing them. When the enemy
rout you should pull back and do it again. Never be fooled into chasing across
the bridge or you will be subject to the same crowding penalties and missile
fire.
Back to top.
Desert
This one deserves a special mention because it provides a bonus to camels and
tires any unit with more than 5 armour out much quicker than usual. Camels are
deadly in the desert, especially to horses. They receive a penalty if you take
then to a lush province though.
Back to top.
3.4
Generals and Kings
On the battlefield a king is always in some kind of heavy cavalry unit like
royal knights or Ghulam bodyguards. A general can be any kind of unit but they
usually appear in more expensive units like knights. Generals and kings both
have more health than any other unit on the battlefield. It takes more than one
hit to kill them. This can lead to some unbelievable situations where a king or
general will fight their way out of an army single-handed. This phenomenon is
called 'Jedi Generals'. The best way to kill a general or king is to attack him
with ranged units. Only two men are allowed to attack a man in melee but there
is no limitation on missiles shot at a man. Therefore a units worth of arrows
provides a greater chance of hitting for damage. If you can't shoot the king you
should surround him with his counter unit and keep attacking, you will probably
get him eventually.
A general or king can bestow a valour bonus on his army by way of his stars. For
every second star a general has all units under his command will receive a point
of special valour. This valour only gives +1 attack +1 defence, it doesn't give
a morale bonus like regular valour.
Back to top.
3.5
When to fight and when to withdraw.
This is something you will need to learn from experience. There are occasions
where your army doesn't stand a chance so you should withdraw on the campaign
map without entering battle. These occasions are often obvious e.g. you have a
single unit of peasants against 12 units of knights. There are other occasions
where it comes down to a personal decision based on circumstances, I can't help
you there. When on the battlefield taking part in a fighting retreat or quick
attack designed to damage the enemy army rather than defeat it the time to
withdraw is a very delicate issue. If you pull back to soon you will not do much
damage, if you leave it too late you will be run down by the enemy as you leave.
The first thing to
note is that you withdraw by pressing control+W not control+O, which is tied to
rout on default. Routing is a panicked flight, which will earn your general the
'good runner' vice (not a good thing) if he uses this method personally to leave
the field. All control over a routing unit is lost unless it rallies, either by
itself (not helpful if you want the unit to go away as the unit will just stand
there doing nothing) or by your order (not reliable so it cannot be guaranteed
to recall previously unwanted units to the battle). Withdrawing is a calm
process that caries no penalties. However it is slow and you lose control of
your troops once the command is given unless you first order them to halt.
Ideally you want to
use up a lot, if not all, of your missile ammo before telling your missile units
to withdraw. If you are fighting to cause as much damage as possible to a
superior foe before leaving the field with as much of your army intact as
possible it is at this point you will then send in the sacrificial melee units
you bought to hold up the enemy while the bulk of your army leaves. Try to keep
your melee units fighting in good order so they last longer and do more damage.
Remember their job is not really causing a lot of damage; that should have been
done by your missile units � anything you get from those sacrificial men is
simply a bonus.
Back to top.
3.6
Sieges
Unfortunately sieges
are pretty dull to fight. If you are the attacker you should bring along the
best artillery you can as well as many tough, well-armoured hand to hand units.
All cavalry can dismount in a siege; this is especially useful in the case of
the various knights as they become powerful infantry able to slaughter the
defenders en mass. Why dismount in a siege? Simple, the main use of cavalry is
speed and manoeuvrability. Neither of these attributes are needed in a siege as
the enemy is nicely penned up in the castle or stood around just outside. The
horse just makes cavalry a bigger
target in a siege. Most missile units are useless in a siege, the walls block
the shots so leave them at home.
You should knock
several holes in the walls before sending anyone in to attack. Use up all your
ammo before moving in; try to destroy as many towers as you can to limit
defensive fire, but only target the towers when you have at least two ways to
get into the castle. When you attack through the breaches do it quickly and from
several directions to force the defenders to split their forces and maximise
your chances of breaking through on at least one front. Send in as many men as
you can, as quickly as you can, and overwhelm the defenders.
When you are defending
you should also dismount your cavalry and forget missile units for the same
reasons as mentioned above for the attackers. Wait for the enemy in the centre
of the castle, force them to walk past all the towers taking casualties. When
they reach the centre you should try to swarm them in a cramped area, like when
they come through a gatehouse or breach.
Sieges aren't over until the last defender dies or the last attacker routs.
Back to top.
3.7
Tactics and fighting styles.
Ok, this is only going to be a basic run-through of some of the ways to fight.
If I did a comprehensive list it would be longer than this entire topic! I'll
divide it by religion as most religions hare similar units and styles.
Catholics
Catholic armies are
made to slug it out in a relatively conventional manner. There are not
especially manoeuvrable (by this I mean that most of their units have average
speed for their type) and most of their units really suffer in the desert due to
their heavy armour. You should always use a core of infantry to hold a stable
centre and launch other attacks from. A line of spears with archers behind and
swordsmen on the flanks is a very versatile formation, especially in early
before the appearance of polearms. Place your general in the middle or on a
flank at the back where he will be protected and can provide a morale boost to
many units at once. Cavalry should go on the wings. For example:
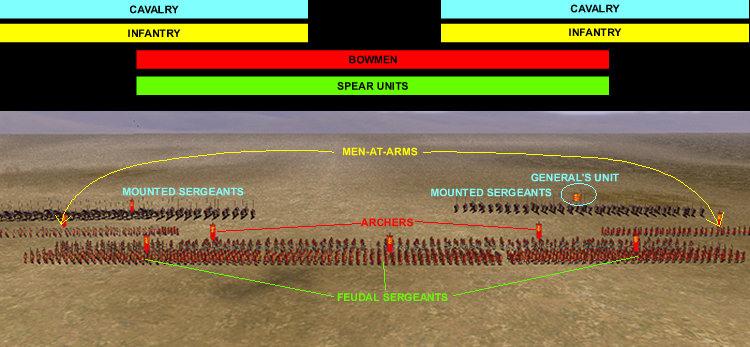
The whole thing should
be able to move forward together, keeping everyone well covered. The cavalry can
easily detach to charge around an enemies flank or intercept a flanking attempt.
The spearmen will engage the enemy in a line and the melee infantry are
positioned to flank the enemy easily when the spears are holding them in place.
The ranged units are protected and will be able to fire continuously, however in
some circumstances you may find it beneficial to send the archers forward so
they are in front of the rest of the army. Times where you may want to send your
archers forward include when you are expecting heavy incoming missile fire (let
the cheap archers take the damage, rather than more expensive units), when you
will be shooting at units with a significant height advantage (if the enemy are
much higher up their ranged units will have a very significant range advantage
over yours, sending your missile units forward lets them absorb the damage, and
also allows them to advance far beyond your army to conduct the missile duel
without endangering your better units), or when you have many missile units and
want to lay down a rain of arrows (stick some missiles in front of your army and
some behind the spears), or when you do not mind more micromanagement and wish
to give your archers the best possible view of their targets (deploy the
missiles out in front, let them shoot and then manually pull them back behind
the spearwall at the last possible moment. This takes practise and experience to
do well, as you have to know how long it will take your men to fall back, and
how long it will take the enemy to reach you). This formation can handle both
attack and defence. Most factions can use it successfully as long as they can
provide spearmen, heavy cavalry, melee infantry and archers.
The ultimate in
Catholic defensive formations is the half-sexagon:

(NB: The formation is
viewed from a slight angle, the long line made up of two units of spearmen is
the front) This shape is formed with four spearmen. A unit of men at arms or
other melee infantry is placed behind each set of spearmen and archers. Ranged
units are placed behind the spearmen and need to be on hold position and hold
formation to stop them moving. A group of cavalry is placed on each flank. Spare
units can be placed in the middle of the formation for protection and later
deployment. For best effects you should place it so the open edge is next to an
impenetrable barrier like a cliff or the edge of the map. The spearmen should
all be on hold position and hold formation. Don't ever tell them to do anything
other than stand there. The enemy will approach while being shot up by the
archers. They will charge the spearmen who will not move and will receive the
full rank bonus. Unless the enemy is a sword type they will not win the fight,
they will take losses from the spearmen even though they haven't been told to
attack. The melee infantry can move out through the spearmen to engage the enemy
or can be sent running around to flank. The cavalry is already positioned to
flank the enemy the moment they are engaged. Generally the enemy will rout
within a minute. This formation is very handy for when you are out numbered and
desperate. It is only for defence; using it to attack will get you shredded.
Other factions can use this formation but it is highly dependant on
well-armoured spearmen, they need to be able to hold out with few losses for a
long time. Using lighter spearmen will result in heavy casualties and a mass
rout. Be warned that once a tiny part of this formation crumbles the whole thing
will collapse very quickly � you will either win and survive or be crushed
messily. Fortunately the formation is exceptionally resilient so it should hold
together unless swordsmen kill your spears or your enemy has a large advantage
in terms of technology.
From high era this formation can be
tweaked with new unit types to expand the principle and become far more
flexible, like so:
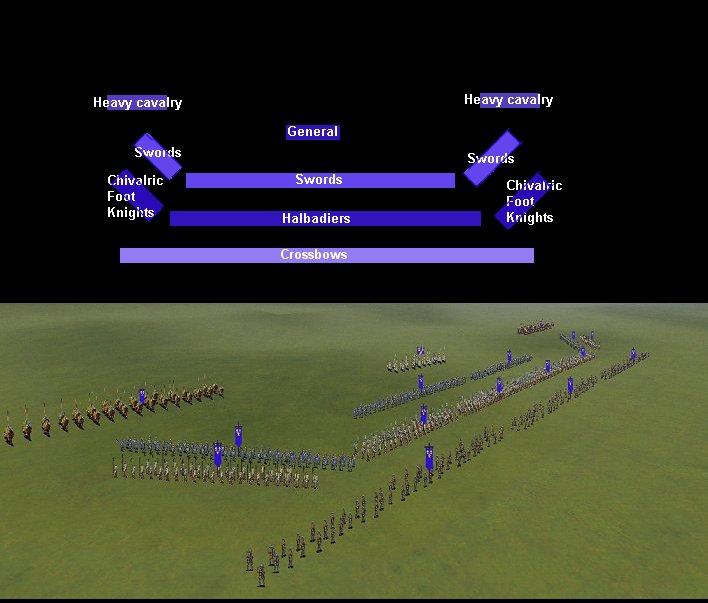
Several of the changes are immediately obvious,
but some of the other implications are only visible to the more experienced eye.
Firstly the spears are gone, completely replaced by polearms, in this case
halberdiers. Secondly the shape of the formation is now slightly different, the
four halberdiers make up a single straight row instead of the half-sexagon shape
the spears made, the sloped flanks are now made up of chivalric foot knights,
another polearm unit. Why? Simply put halberdiers have poor morale and need
their flanks protecting and guarding well or they risk routing. Chivalric foot
knights have sky-high morale and excellent fighting capacity, so they make
perfect anchors for the formation�s flanks. Remember also that most of the
heavy fighting and morale sapping penalties will hit the flanks, as the enemy
try to hit you at the weak point
flanks often represent. Therefore the foot knights will both survive the worst
penalties and ensure the halberdiers get a chance to stand and fight for a long
time. Please note that you do not have to use foot knights to anchor the flanks,
any infantry unit with high morale and good fighting power will do, however foot
knights are the best of the best for the Catholics and can be obtained quite
easily in a manner that makes your army more versatile � simply build
chivalric knights and dismount them when you reach a battle where this formation
is more use than the speed and mobility of cavalry. The longer frontline
provided by the four halberdiers in a line also makes it harder for the enemy to
swarm your formation. You may notice that the halberdiers are in three ranks,
rather than the two ranks that will allow them to wrap about enemy units and
cause more damage. This is because I am assuming (pretty much inevitable given
the nature of this formation) that they will be receiving a lot of charges by
both infantry and cavalry, therefore three ranks will give them a better chance
of resisting the devastating effects of a strong charge on a thinly spread unit.
Another immediately obvious change is in the position of the missile units �
they are now deployed in front of the formation by default. This is because the
appearance of the crossbow and arbalest has forced a change in tactics, unlike
bows these weapons can only fire in a straight line, so no arcing shots over the
heads of units in front. These crossbowmen benefit from being on hold
position/hold formation so they do not move, ever. Instead of withdrawing them
as the enemy get close you will take advantage of the polearm unit�s lack of
rank bonuses and charge them forward � unlike spear units polearms have no
bonus that is best maintained by standing still. It takes a bit of practise and
experience to learn precisely when to start your men running forward (double
click the target, remember this is not ordering a charge, just a run to get the
men out to fight quicker) so they hit the enemy before your missiles get engaged
in melee, but without moving too soon and losing valuable shooting time. The
swordsmen, general and heavy cavalry are all in the same positions and serve the
same purposes as they did in the spear-based version of this formation.
With the dawn of late the pike becomes
available and a new type of formation along with it.
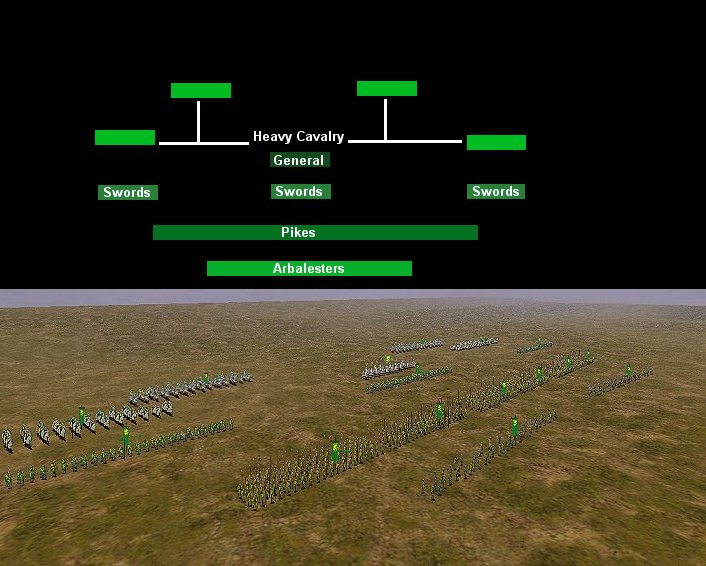
The core, and real fighting power, of this army
comes from the 6 units of pikemen right in the centre. They will be doing most
of the work; everyone else is just there to support them. This formation replies
on several key things, and if any of them fail you are in a bad situation. The
good news is that this formation works equally well for both attacking and
defending and can be quite devastating when everything goes well. It all focuses
on the pikes and how they work, keep them in a position where they can do their
job and you should be fine. What do the pikes need to do their job? Protection,
[purely and simply their flanks must be guarded at all times and they
[I]must[/I] stay in tight, orderly formation as all the pike units advance and
fight [I]together[/I] in a wall. Reach unit of pikes needs to be in a minimum of
6 ranks, and deployed as close as possible (but not so close the units
automatically start to move away from each other) to their neighbour on each
side. Leave no gaps, make sure the line is straight, only move as a group and
keep that formation dressed! Always but always make sure your pikes are in hold
formation, don�t order them to run (as that will increase the chances of them
losing formation and even a slight disruption really
matters here), and try
to let them stop frequently to redress their formation. The unavoidable flanks
at the far ends are protected by a unit of swords (or polearms, or another unit
of high morale and good combat power infantry) and a unit of heavy cavalry. They
present a strong force that discourages the enemy from harassing your flanks, as
well as being strong enough to see off most flanking attempts before they pose
much of a threat to the pikes. They can also move forward to engage the
enemy�s flanks when the pike wall has engaged the main enemy body. The
general�s unit and the third unit of swords are there to plug any gaps in the
main line, or to go fight at trouble spots; in essence they are your reserve. In
front of the pikes you can see two units of arbalesters, they will do as much
damage to the enemy as possible before the pikes reach contact. If you wish you
can swap the arbalesters for gunpowder units, but this is not advisable �
there are other units that are more disposable in this army and your arbalesters
are practically required to handle any serious missile requirements. Gunpowder
units will not be able to cause damage like arbalesters can, but with a lot of
careful usage and some good luck they can cause severe morale damage to the
enemy and encourage them to rout far quicker. I would say no more than two units
of guns if you are absolutely determined to play with fire, swap two of the
heavy cavalry units (the ones at the back in this formation) for the guns, and
deploy your guns on the flanks of the pikes just in front of your swords. When
the pikes engage the enemy let the guns fire into the enemy flanks at close
range, they will do a tiny bit of damage and start causing big morale penalties
in any unit they shoot � including yours, so do be careful of friendly fire!
If those two units of cavalry are so disposable you may wonder why I included
them, simply they provide mobility and extra protection for those oh so critical
flanks, as well as being a highly mobile reserve and a ace in your sleeve as
most heavy cavalry (particularly knights, and let�s face it if you are playing
Catholic you will be using knights rather than the other types of heavy cavalry)
will dismount into great infantry. Gothic or chivalric foot knights really pack
a punch. This formation really does need flat and clear ground, as you may
imagine hiking up and down hills or through trees disrupts the line, and then
the enemy will start to exploit those gaps making your pike wall crumble to
dust. If you can use Swiss armoured pikemen for this formation you should leap
at the chance, as they are the best pikes in the game. Swiss
pikemen are a tolerable substitute, generic pikemen are rather lack lustre and
should be heavily upgraded in all possible fields (attack, defence, morale,
armour) before you consider using them.
What do you do when
your faction has many types of spear units but not many other unit types (for
example many factions in the Viking campaign)? The spear wall is a good
solution.
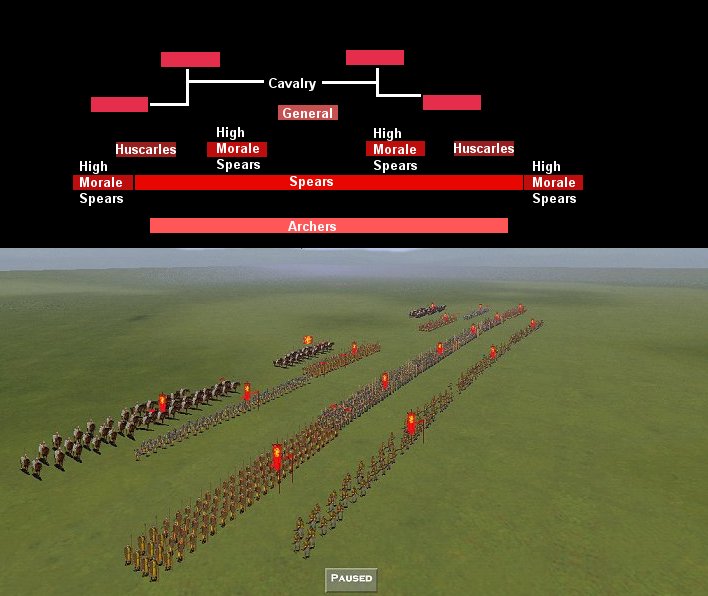
The spear wall is a
bit of a pain really, it forces you to break those neat rules for optimising
your spear�s fighting prowess and to faff about keeping exceptionally well
dressed ranks at all times. It is quite similar to a primitive version of the
pike wall above, in that you must deploy your units as close together as
possible, in a very neat and straight line, and with the flanks protected
exceptionally well. The example of the spear wall in this diagram is from the
Viking era, using the Saxons. It is set up to attack, if this army was defending
it would be beneficial to make a larger version of the half-sexagon defensive
formation outlined above, with the archers placed firmly in the centre. In the
early Catholic formation shown above the archers are deployed behind the spears,
even when attacking except in very limited circumstances. In this formation that
is not the case � it is only in rare circumstances that the archers go behind
the front line of spears. This is mostly because of the second line of spears
you can see forming the reserve. When you need those reserve spears to get into
the fight you need them there quickly, if they have to push past archers to get
to the fighting their formation will be disrupted and it will slow them down, a
small thing indeed but it can prove disastrous. The huscarles and other
non-spear units can push their way past archers a bit faster (well it seems that
way to me) and they don�t need to keep their formation immaculate to receive a
rank bonus. That is the crucial difference in deciding where to deploy the
archers. You may be wondering why the spear units forming the reserve and on the
flanks are labelled as �high morale spears�, this is because the average
spear unit has poor morale and is therefore prone to routing when flanked or
moving in to support a damaged and possibly fleeing army. Most factions in the
Viking era can access a spear unit with good morale, but somewhat poorer stats
for straight up fighting. In this diagram armoured spearmen form the fighting
core, while Fyrdmen with their high morale/low armour support them. If you
swapped the unit�s roles around your fyrd would take heavier casualties and
rout even with their high morale, whereas the armoured spearmen would be wasting
their combat power and fleeing as soon as the fyrd begin to waver, making their
function as a reserve useless. Unless you manage to tempt the enemy into
charging at you as you advance to attack you will have to charge your own spears
and risk losing that all important rank bonus. The best you can do if forced to
charge yourself is to walk to contact keeping that line and the individual units
well formed up, before assigning individual targets you your units when very
close to the enemy and letting the unit�s officers order the charge. Running
or advancing piecemeal will only hasten and exaggerate the collapse of your
ranks. However where possible you should concentrate in advancing just short of
the enemy lines, and shooting them with your archers until they move to attack
you, then let your spears stand firm on hold position and take the charge. This
formation can handle rough ground, but trees, steep hills, and mountains will
cause no end of trouble.
Catholics in the desert.
If you need to fight in the desert you should use
troops with less than 5 armour. Don't use armour upgrades and you will be able
to take the entire feudal line of units into the desert with few problems. There
are also kerns and gallowglasses that fare especially well in the desert, so try
to capture Ireland before leaving for hotter parts. The English and French can
also build hobilars; powerful light cavalry that perform well in most conditions
so take advantage of them if you are heading to the desert as either of these
factions.
Cheetah has pointed
out that the Catholics do have at least one type of ranged cavalry each, so it
is possible to create a more cavalry heavy army in the same style as the Muslim
and Orthodox factions. Personally I prefer the infantry route but you should try
both and make up your own mind.
Back to top.
Muslims
The Muslims are built
more towards fast cavalry and missile attacks than toe-to-toe slugging matches
like the Catholics. You need to play them with a more hit and run style. They should
have more cavalry in the armies than the Catholics, especially cavalry archers.
You can base an army around a line of six or so spear types which will hold a
centre your cavalry can work from and retreat to.
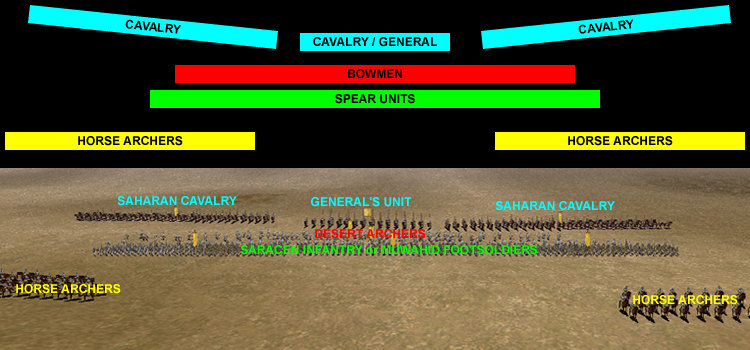
The ranged cavalry are
at the front, while the heavier cavalry and the general are protected behind the
spear wall awaiting a chance to flank. Send out groups of ranged cavalry to
pepper the enemy with arrows. If they charge you should pull back and see if
they follow. If they do follow you should jump the unit with several of your own
and destroy it before help can arrive. Keep doing this until the enemy is so
warn down you can crush them in hand to hand. Always use your camels against
horses, as they are highly effective.
The Turks deserve a
special mention for their Janissary troops. In the late period they can form an
effective army consisting of a main line of Janissary heavy infantry with ranged
support provided by Janissary archers and infantry. This allows them to fight in
a similar manor to the Catholics, as Janissary heavy infantry is probably the
best melee unit in the game, able to crush most opposition.
The Almohads are also
a special case. At the beginning of the game they don't have much cavalry.
Instead they have the best Muslim infantry unit until the Janissaries start to
appear - the Almohad urban militia. They are very strong swordsmen, equipped
just like the Catholic feudal men at arms. You should use these guys to form the
bulk of your army, let them attack anything that isn't on a horse. Bring along
whatever spearmen you can build to take on the cavalry.
 Here the units of
Almohad urban militia hold a front line (they should be in ranks two deep but I
had to deploy them in threes to get them to fit in the picture) with a unit of
spears on each flank. Directly behind the militia are some archers.
Reinforcements and the generals unit are at the back protected until they are
needed. The Almohad urban militia can kill cavalry if they gang up of them,
especially if you use a unit to hit from the rear. You should also consider
placing your men in forests if you are fighting on a map that has them, this
makes the militia into deadly killing machines that can take out almost any
early period unit, as the militias counter units become weak in the trees.
Here the units of
Almohad urban militia hold a front line (they should be in ranks two deep but I
had to deploy them in threes to get them to fit in the picture) with a unit of
spears on each flank. Directly behind the militia are some archers.
Reinforcements and the generals unit are at the back protected until they are
needed. The Almohad urban militia can kill cavalry if they gang up of them,
especially if you use a unit to hit from the rear. You should also consider
placing your men in forests if you are fighting on a map that has them, this
makes the militia into deadly killing machines that can take out almost any
early period unit, as the militias counter units become weak in the trees.
Back to top.
Orthodox
The Russians should be
played in a similar manor to the Muslims as they share the same emphasis on
skirmishing and ranged units. The Byzantines however can be played similar to
both the Catholics and the Muslims due to their superb Byzantine infantry and
selection of cavalry. A 50-50 balance between infantry and cavalry is good as it
takes advantage of all the Byzantines special units, for example this army has 7
units of cavalry (including the general) and the rest is assorted special
Byzantine infantry:
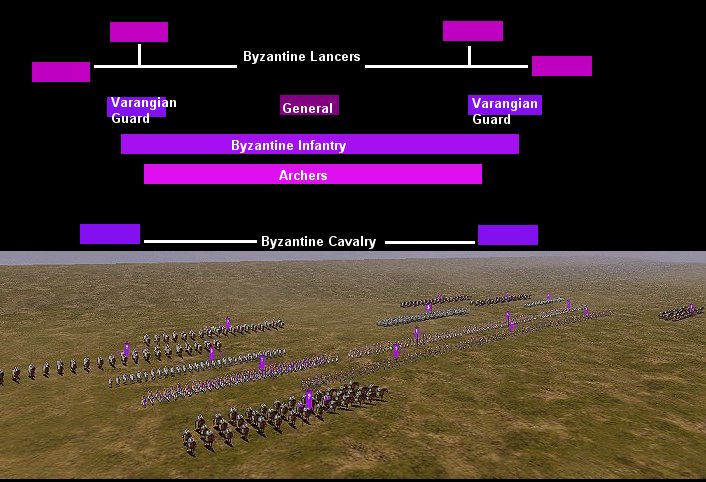
The line of Byzantine
infantry with a few Trebizond archer and Varangian guards to support can slowly
advance while the Byzantine cavalry skirmishes. Once the melee is joined units
of Kataphraktoi and Pronoiai Allagion/Byzantine lancers can be sent to flank.
The Varangian guards can be used to support weak spots or attack particularly
dangerous units, as well as providing a high morale, reliable reserve force. The
Byzantines need to balance their speed and power to be truly effective. In this
diagram the archers are deployed ahead of the infantry line, this is because
Byzantine infantry have comparatively fragile morale and casualties combined
with the morale penalty for being shot at will make them easier to rout before
they even get into melee combat. For this reason it is better to let your
archers take the arrows in their place.
Back to top.